Looking for a Contractor?

Alchatek Blog

Sunken Slabs and the Cost of Neglect

Posted by Andy Powell on Oct 13, 2017 4:30:32 PM

hazard-banner.png

It was about 2 AM when the fire alarm when off in my hotel room.  I have never heard an alarm so loud in my life; all I wanted to do was get out of the room but it was so disorienting that I could barely throw some pants and a shirt on.  My instincts told me this was a false alarm as I trudged down 5 flights of stairs to the bottom level.  I was behind an elderly couple so it was slow going as we navigated our way out.

This particular stairwell brought us out on the side of the building and I noticed it was dimly lit.  This was a nice ocean front resort hotel and the lighting in my opinion should have been brighter.  About the time I noticed that, the elderly lady in front of me tripped and fell right on her face on the sidewalk.  She was about 5 yards in front of me and I was first to her side; she had fallen behind her family.  Fortunately a quick responding fire department rolled up right then and I ran over to get their help.  They got her up and into the paramedic truck. 

hazard-blog-1.pngIt looked like the lady was going to be okay but the point is that this was probably avoidable.  When I ran to her side I could see the sidewalk tripping hazard that had caused her to fall.  Combined with the dim lighting it was a case of dual premises liability.  I give talks to groups like IFMA and BOMA just on the topic of Tripping Hazards and Premises Liability.  The numbers are staggering when you look at the amount of incidents and the costs associated with them.  The toll is financial: lawsuits, settlements, workers comp, bad press.  And the toll is physical: injury and sometimes death.  This is the cost of not knowing that you may have tripping hazards on your property; or worse it is the case of knowing and not doing anything about it.  Those factors weigh heavily in court.
 
The ADA says a sidewalk more than a 1/4" out of level constitutes a tripping hazard and requires a ramp to be installed.  OSHA has falling as one of the leading (if not THE leading) cause of death in the workplace; with the majority being falls from ground level as opposed to falls from a height.  Finally, DOT studies show that people's feet clear the ground by a mere 1/8" while walking.  That's why it is so easy to trip over something you can't see.
 
It's also much easier to look up "slab lifting" on the internet and find Alchemy Spetec on page 1.  There you can learn how the Alchemy line of Slab Lifting and Soil Stabilizing products can solve your tripping hazards rapidly and permanently.  We've got your back! 

Want more information on slab lifting?

Download an Info-Packed Slab Lift Brochure!

Topics: All Posts, Lift Slabs, Stabilize Soil

Save Money & Hassle by Re-Circulating Your A-Side Material

Posted by Stephen C. Barton on Oct 11, 2017 3:40:01 PM

re-circulating the material-banner-2.png

The bane of slab lifting equipment is the iso.  It turns your hands black if you get it on them and it is the main culprit that causes pressure imbalances.  For some reason, in the past few years the problem has gotten worse.  I suspect is has something to do with changes in the chemistry of the raw materials.

Contractors who use their rig on a daily basis have less of a problem.  If your rig sits for any length of time, the iso (A side material) can start to setup in the hose.   We see this most often at the end of the whip hose right next to the gun.  The solution is simple, but you have to be vigilant.  Make sure you have greased up the threads on the A side drum, change your desiccant drum cartridge when the desiccant changes color, and follow the instructions below to recirculate the A side material every 10 days that your rig sits unused.

Step 1:

Use the drum pump to shoot some A-side material into a waste bucket. When the material coming out of the hose looks clean, move on to step 2.  It shouldn’t take long.

re-circulating the material- blog (1)-2.pngStep 2:

Re-circulate the material through the hose back into the A-side drum.  Use a paint filter bag  or panty hose to strain the material.  This will prevent any cured iso that has formed in the hose from getting back into the drum.  Do this step for 5 to 10 minutes (more if you have a lot of hose and less if you only have one or two sections).

re-circulating the material- blog-3.pngStep 3:

Make sure your drum is closed up tight with white lithium grease on the threads.  Same with the plug on the end of the hose.

NOTE:

You can pump the A side material using only the drum pump.  However, if the pump sits for more than a couple of weeks you will want to also fire up your proportioner for a couple of minutes at low pressure to make sure you have fresh iso in the pump cylinder as well.  To do this you will need to recirculate the B material at the same time.

Want more info on concrete leveling with Alchemy-Spetec lifting foam?

Download an Info-Packed Slab Lift Brochure!

Topics: Equipment & Accessories, All Posts, Lift Slabs

Concrete Leveling - A Special Case

Posted by Andy Powell on Sep 18, 2017 4:45:37 PM

concrete block-banner.png

In the movie "Heartbreak Ridge", Clint Eastwood says his Marines are taught to "Improvise, Adapt, and Overcome".  You gotta love the United States Marines and of course, Clint Eastwood.  So if they don't mind, we are going to borrow that phrase because that's what we had to do when we came up against a tough slab lifting job this past weekend.  

Here at Alchemy-Spetec, we do have a 20' trailer rig with a PHX-40 pump in it.  We use it for slab lifting demos, training events and product testing.  This past weekend we used it to help out a family in need.  Their home was built in the 1990s and the garage was built on fill dirt surrounded by a concrete block wall.  Within a year of moving in, the garage slab settled several inches indicating poor compacted fill dirt.  The builder wouldn't address it, disappeared, and left this family with a sloping garage slab they've had ever since.  It had since become worse and something had to be done. 
 
A site evaluation told us that this was going to be no ordinary slab lift.  In some areas there were voids over a foot deep beneath the slab!  From the outside, it was easy to see where the CMU (concrete masonry unit a.k.a. concrete block) wall was buckling outwards.   Slab lifting with polyurethane exerts lateral forces too so I was worried about pushing the wall out further (which in turn would cause a collapse of the garage slab, wall, and everything else attached). 
 
This might have been a job to walk away from, but I thought there might be a way to do it.  First we installed bracing on the exterior of the CMU block wall to offer some support against the lateral forces likely to be exerted.  Once that was completed we began injecting in a grid with AP Lift 430, starting at the lowest point and working our way out from there.  
 
Copy of Concrete Block-social.png
 
I won't lie, this job was taking a lot of material because of the voids and the amount of lift required.  There was a lot of creaking and grinding going on as the slab was raising.  At one point we stopped and I decided to try something to give the wall more strength.  Inside the garage there was a cap block that ran along the top of the CMUs.  Drilling through the cap block, I was able to inject and fill the CMU wall cavities with the AP Lift 430, thereby tying those courses of block together with a polymer column. 
 
Concrete Block Slab Lifting-3.png
 
That wall isn't going anywhere for a long time now, and strengthening it allowed us to complete the lift.  Now they can park the car in the garage for the first time in 15+ years, and the entire job took less than a day.  In all 
we raised the interior slab up over 4 inches.  
 
So next time you see a tough looking slab lift, ask yourself if you're going to just walk away or whether you're going to step up to the plate.  Make Clint proud!

Want more information on slab lifting?

Download an Info-Packed Slab Lift Brochure!

Topics: All Posts, Lift Slabs

MixMaster Pro Tips

Posted by Andy Powell on Sep 15, 2017 4:48:55 PM

Mixmaster-banner.png

People buy the MixMaster Pro because they want the most dependable, high production slab lifting gun on the market. Sometimes they can't wait for hands on training and we have to go ahead and ship a gun to a customer we haven't been able to train face to face. To help get you up to speed on the MixMaster Pro, we captured some footage at recent job where I'm using the MixMaster Pro and discussing best practices.

Want more informaton on the MixMaster Pro?

Download an Info-Packed MixMaster Pro Brochure!

Topics: Equipment & Accessories, All Posts, Lift Slabs

Information is Power - Slab Lift Tools You Need to Know About

Posted by Andy Powell on Aug 30, 2017 3:50:15 PM

tools-banner.png

There are contractors that lift the everyday slabs, performing a great service fixing trip hazards, reviving previously unusable floor space, and supporting the investment of the property owner.  Then there are slab and foundation lifting contractors who take it to the next level – every opportunity is a challenge to be conquered.  The results are often fantastic – people’s entire homes lifted back into place, factories and warehouses returned to life, and countless potential hazards and injuries avoided.

tools-blog (4).pngBut first you’ve got to understand one thing; you can’t bring a knife to a gunfight.  Expert contractors have to know what is going on at all times.  In the picture at the top of this post, you can see a slab that I probably would have not attempted to repair.  However, with several tools to help monitor the different pieces of this puzzle, this contractor was able to put it back together again.  They say information is power and I am a firm believer in that, especially when it comes to taming jacked up concrete slabs.  In the picture you can see three different slabs.  Our customer Morgan Helms of Helms Polyfoam (Jackson, MS) is using a ZipLevel, a machinist’s dial indicator, and a putty knife to monitor what each of the slabs is doing.

The MixMaster gun is injecting underneath the slab that he wants to raise. 

So what are these different monitoring tools doing?  Let’s take a look….

  1. tools-dial.pngThe dial indicator tells him which slab is moving. In the picture, the base of the dial indicator is on the slab that Morgan is injecting under while the dial point is on the slab he doesn’t want to move. It doesn’t really matter how you configure it as long as you understand what the needle movement means.   A needle on a machinist dial indicator moves in .001” increments.  If the needle on this dial indicator is rising, that would mean the wrong slab is lifting and he knows to stop.  If the needle is falling then the slab he is injecting under is lifting, and that’s what he wants.

  2. tools-zip level.pngSo what if both slabs are moving equally? In that case the dial indicator would remain stable or fluctuate slightly in both directions.  This is where a ZipLevel or a laser transit would come in handy.  Morgan has his ZipLevel indicator box (in yellow) on the slab he doesn’t want to move.  It will let him know if the slab he doesn’t want to move is lifting so he can stop and re-evaluate what to do next.

  3. tools-putty knife.pngOne of my favorite tools is the metal putty knife. Slabs often move in increments so small that you can’t detect them visually.  If you wedge a putty knife into a crack between two slabs, you will see it wiggle when there’s slight movement.  So the putty knife in the picture is on the third section of slab and letting Morgan Helms know what is going on with that piece.

You can use other things like string lines, tape measures, and laser transits as well.  The point is that real time information is likely to give you a better finished result, and it will also help you avoid making mistakes.

Want more information on slab lifting ?

Download an Info-Packed Slab Lift Brochure!

Topics: All Posts, Lift Slabs

Concrete Leveling Time Lapse

Posted by Charlie "The Grout Geek" Lerman on Aug 25, 2017 4:53:26 PM

Concrete leveling-banner-2

Not too long ago, I had the opportunity to assist on a concrete leveling job involving a sunken garage slab.  This particular slab had a massive void underneath that needed to be filled before the slab would lift.  In just a few hours, we had the void filled and the slab level again.

Quick recap for those who are new to polyurethane slab lifting: Concrete slabs settle due to voids or unstable soil below. By pumping a polyurethane foam through the concrete, you essentially push the concrete slab back up from below. Using polyurethane foam is very cost effective, environmentally friendly, and causes very little downtime.

Check out this incredible time lapse footage our marketing team captured!

Concrete leveling-blog-1

Want more information on concrete leveling with polyurethane foam?

Download an Info-Packed Slab Lift Brochure!

Topics: All Posts, Lift Slabs

Slab Lifting Time Lapse

Posted by Charlie "The Grout Geek" Lerman on Aug 18, 2017 3:01:08 PM

slab lifting - banner-1.png

I recently assisted on a job in which a large void underneath a homeowner’s garage had caused the slab to sink. Our marketing team got some GREAT time lapse footage of the slab lift.

Quick recap for those who are new to polyurethane slab lifting: Concrete slabs settle due to voids or unstable soil below. By pumping a polyurethane foam through the concrete, you essentially push the concrete slab back up from below. Using polyurethane foam is very cost effective, environmentally friendly, and causes very little downtime.

slab lifting- blog-1.png

Check out this awesome time lapse footage! 


Want more information on slab lifting with polyurethane foam?

Download an Info-Packed Slab Lift Brochure!

Topics: All Posts, Lift Slabs

Polyurethane Slab Lifting Explained

Posted by Charlie "The Grout Geek" Lerman on Aug 16, 2017 2:57:29 PM


Polyjacking- Commercial and Industrial Slab Lifting Animation-banner (1).png

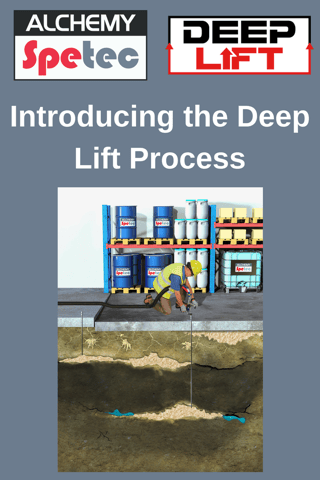
Sunken concrete slabs can be lifted back into place with two-component polyurethane foams designed to work in wet or dry conditions. The expansion force of the concrete leveling foam coupled with the pressure of a specialized pump generate enough controlled force to lift virtually any structure back into position with 1/8” precision. 

Alchemy-Spetec's AP Lift 430, AP Lift 440 and AP Lift 475 are the most dependable foams for jacking and leveling concrete slabs.

Watch this animation for an explanation of the the slab lifting process...

 Want more information on lifting slabs?

Download an Info-Packed Slab Lift Brochure!

Topics: All Posts, Lift Slabs

Hydrophobic vs Hydrophilic: Polyurethanes

Posted by Charlie "The Grout Geek" Lerman on Aug 14, 2017 3:31:25 PM

polyurethane-banner-2.png

The terms hydrophobic and hydrophilic may not mean anything to the average person. But, to a contractor, these terms can mean a world of a difference. Hydro means water while phobic means “to fear” and philic means “to love”.  Alchemy-Spetec offers both hydrophobic and hydrophilic polyurethanes, so it is important to be aware of the differences between the two types.  

Hydrophobic Polyurethanes

polyurethane-blog-4.pngHydrophobic polyurethanes naturally repel water (similar to the way oil would repel water and stay separate if you were trying to mix them in a glass). These products push water out of the area in question as they expand. Hydrophobics are used with catalysts which allow you to adjust the set time. They also have zero shrinkage after curing.

Check out these hydrophobic polyurethanes:

Hydrophilic Polyurethanes

Hydrophilic polyurethanes naturally mix with water before curing (similar to the way gin and tonic mix thoroughly in a glass). This characteristic allows for a very strong chemical and mechanical bond, as water helps pull the material into the pores of the concrete. These products do not require a catalyst. You can pump them straight out of the pail.

Check out these hydrophilic polyurethanes:

Don't Oversimplify These Concepts

Don't get caught in the trap of oversimplifying hydrophilic vs. hydrophobic.  There are varying degrees of each (see chart below for more information on how this is measured) .  

Hydrophilic vs Hydrophobic.png

Some hydrophilic materials will keep absorbing water (10-15 times their original volume).  Others (such as our AP Seal 500) only absorb as much water as is necessary for their reaction and then they reject the rest.  Yes, hydrophilic gels will shrink like crazy in the absence of water, but the AP Seal 500 won't.  It is completely safe to use in a dry environment.

Want more information on Alchemy-Spetec products?

Download the Info-Packed Geotech Product Catalog!

Download the Info-Packed Leak Seal Product Catalog!

Topics: All Posts, Lift Slabs, Seal Leaks, Stabilize Soil

Best of Recent Slab Lifting Posts

Posted by Kreg Thornley on Aug 7, 2017 11:30:00 AM

best-banner.png

Needless to say, there's been an abundance of content posted on this blog lately. This week we'll round up the best content from our 3 post popular topics: Lifting Slabs, Stabilizing Soil and Sealing Leaks. You may or may not have missed some of these posts the first time around. Regardless, it's always helpful to pause and review this information in order to process it more thoroughly. Today's focus is lifting and stabilizing slabs. Here are three essential recent posts...

2-3.pngStructural Polyurethane Foams For Hurricane Season

By Andy Powell

Per usual, meteorologists predicted a higher than average degree of activity for this year. It’s easy to pile on the pressure for accuracy from the weather people, but last year they accurately predicted and tracked two storms that affected our coasts.

Hurricane Matthew and tropical storm Hermine both caused significant damage in the gulf and on the east coast. Matthew especially caused a tremendous amount of flooding as opposed to wind damage because of the way it tracked parallel to the coast for so long before making landfall.

Click here to read more...

Commercial and Industrial Slab Lifting

By Andy Powell

Sunken concrete slabs can be lifted back into place with our two-component polymer foam designed to work in wet or dry conditions. The expansion force of the concrete leveling foam coupled with the pressure of a specialized pump generate enough controlled force to lift virtually any structure back into position with 1/8” precision. Polyjacking and concrete lifting can be accomplished at a fraction of the cost and time required for replacement using our AP Lift series of resins.

Click here to read more and watch an excellent demo video...

Stabilizing a House with AP 475

By Andy Powell

Eroded soil and voids underneath a structure can result in settlement and damage to the structure. These dangerous voids can be filled with high strength polyurethane foam that supports up to 14,000 pounds per square foot. The video in the linked article shows the stabilization of the back half of a residence resting on nothing but its frame and thin air.

Click here to read more and watch the video...

Want more info on lifting and stabilizing slabs with polyurethane foam?

Download an Info-Packed Slab Lift Brochure!

Topics: All Posts, Lift Slabs