
 Contrary to popular opinion, as a contractor, you don’t have to put up your equipment and rigs due to cold weather. There are many jobs to be done and many ways to keep your material conditioned. Use this season to your advantage and gain valuable business.
Cold Weather Markets
Seasonal attractions such as theme parks are a great place to start looking for winter work. Many of these parks (the ones that aren’t in Orlando) shut down for the winter and this is the time they do maintenance and repairs. Think of all the concrete lifting and leveling that can be done.
Factories can be less active in the winter months with production slowing down in many industries. This is a good time for them to do maintenance and floor repairs as well.
Warehouses typically operate year round, so there is always work available. Warehouse floors are used and abused on a daily basis and will sooner or later need some form of repairs done to keep business running at a steady pace. In addition, many warehouses have dangerous voids beneath their floors that require repair.
Exterior concrete slabs are still worth considering, even in the cold weather. These slabs experience the most wear and tear from the environment itself (think erosion) and daily traffic. You’ll need to lift concrete slabs before the ground freezes and only after your materials have been thoroughly conditioned.
Conditioning Materials
Your slab lifting equipment probably has built in heaters and a heated hose. Each brand and model of pump has different sized pre-heaters and different ∆T (∆ = Delta and T = Temperature). This sounds complicated, but is actually quite simple. ∆T is simply the change in temperature. Let’s say your material has been sitting in a cold trailer all night and the temperature has dropped to 40 degrees F. If the required temperature of your B side material is 120 degrees F, then your pump better be rated with a ∆T of at least 80 degrees. However, if your material is preconditioned to 70 degrees F, then your machine only has to be rated for a ∆T of 50 degrees. As I said, every machine is rated differently based on the size of the heaters. What is important to know is that there are limitations to how much heating your machine can do.
Keeping your materials conditioned in the winter months is a lot easier than it sounds. The main point is to keep your AP Lift products above 60 degrees at all times. Keeping the polyurethane at or above that temperature can be accomplished in a number of ways.
If you have an insulated rig, it should stay around 40 degrees warmer than outside temperatures. Most foam rigs have built in electric heaters that require an extension cord to a power outlet at the job site or at your facility for overnight storage. Alternately, you could buy an electric radiator heater. Other available heating devices include drum band heaters and heated drum mats (be careful not to scorch the polymers by turning band heaters up too high). For a more DIY approach, you could build a hot box around the material storage area in your rig.
Heat Sink
Another consideration when lifting cold slabs is the heat sink factor. AP Lift products come out of the gun hot and get even hotter as they react. However, cold concrete acts as a heat sink and sucks the energy out of the foam as it starts to react. This can slow down the reaction speed of the foam. If you are pumping into a void, it will have little effect because most of the foam is not in contact with the concrete. If you are trying to lift a slab with little void, it will have more of an effect because more of the foam is in contact with the cold concrete and cold soil. More volume = more energy.
Conclusion
Don’t let common preconceptions deter you from slab lifting in cold weather. As noted above, there is no need to shut down completely for the upcoming winter months if you don’t want to. Opportunities still exist and one of them may just be the job you’ve been looking for all year. There are many ways to keep your equipment and materials conditioned to efficiently work in lower temperatures. Have more questions about slab lifting in cold weather? Call us at 404-618-0438.
Editor's Note: This post was originally published in 2018 as Slab Lifting in Cold Weather.
Want more in-depth info on slab lifting?


.jpg?width=1400&name=1.%20Banner%20-%20Lifting%20with%20the%20PolyBadger%20(Demo%20Video).jpg)
.jpg?width=300&name=2.%20Body%20-%20Lifting%20with%20the%20PolyBadger%20(Demo%20Video).jpg) The Alchemy-Spetec PolyBadger lifting system is tough and compact. This system is an affordable entry-level option for new contractors, as well as an extremely portable addition to the experienced contractor’s arsenal. The PolyBadger is a lot less expensive than your standard 20 foot trailer rig. The set up is simple and requires minimal equipment. The entire system can easily fit in the back of a pickup truck!
The Alchemy-Spetec PolyBadger lifting system is tough and compact. This system is an affordable entry-level option for new contractors, as well as an extremely portable addition to the experienced contractor’s arsenal. The PolyBadger is a lot less expensive than your standard 20 foot trailer rig. The set up is simple and requires minimal equipment. The entire system can easily fit in the back of a pickup truck!
 This article, written by guest blogger Mic Ewart (Geotech Go-To and Victorian State Manager of
 On this episode of

 This post is part of the Alchemy-Spetec
 We understand that chemical grouting is often not the primary focus of a construction or repair job, but a water leak can often bring the rest of the job to a screeching halt until it is sealed. Job costs then start to pile up, production or facility services stay shut down as time drags on, sometimes tempers begin to flare. Sound familiar?

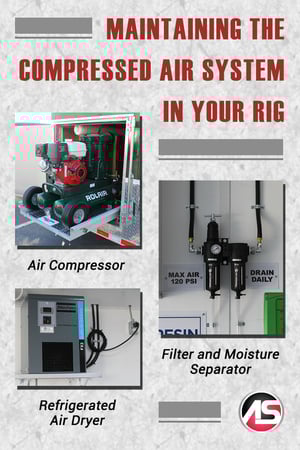 I don’t know what it is about this time of year but for some reason at the beginning of fall we receive the most tech support phone calls from slab lifting contractors. Some of it is related to the changing weather, but this past week several things happened that made me want to address a specific topic – the compressed air system of the polyurethane foam rig.
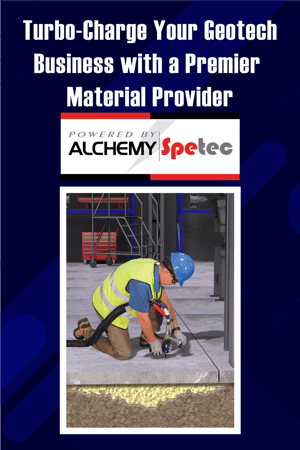 The choice of a polyurethane material provider for your geotechnical contracting business is a critical decision with far-reaching consequences. In addition to top quality concrete and soil repair material, a premier provider will offer reliable high-performance equipment, rock-solid tech support, extensive training resources and even marketing assistance.