
 To backer rod or not to backer rod? That is the question.
Alchemy-Spetec has stepped into the world of industrial floor repair. For years we have developed products for lifting and stabilizing concrete slabs. Now we have taken the next step and developed a couple of products for repairing and protecting the edges of the interior concrete joints. This latest development has re-opened discussions I used to have on a regular basis about joint sealer, joint fillers, and the use of backer rod.
Let me cut to the chase. There is a big difference between a joint sealant and a joint filler. Joint sealants are mostly for exterior applications. The purpose is to prevent water from entering the joints and eroding the soil beneath the slab (call me if that happens, I have the best solution for rocking slabs). Joint fillers, on the other hand, are typically used indoors and their purpose is to protect the edges of the concrete joints from chipping and spalling.
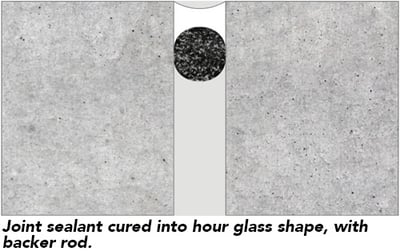 In order for a concrete Joint Sealant to work, it has to be flexible and adhere tenaciously to the concrete. These materials are typically silicone, polyurethane, or polysulfide based caulks. The cured material should end up in an hour glass shape (picture an hour glass laying on its side). This allows the material to deform and stretch in the thin part of the hour glass. The hour glass shape is formed by installing a round backer rod pushed down in the joint so that the top of the backer rod is at a depth that is half the width of the joint. The material is installed into the joint and then tooled so the top forms the shape of the hourglass.
Joint Fillers, on the other hand, have a different purpose and different method of installation. These materials are typically epoxy, polyurea, or a polyurea hybrid. You should NEVER use a backer rod at a depth of less than two inches when using joint filler. If you do, it will result in the material failing. You can use a maximum of ¼” of dry silica sand at the bottom of the saw cut to help prevent the liquid material from flowing into the crack below the saw cut. Faster set materials (polyurea hybrids) also help prevent leakage into the crack.
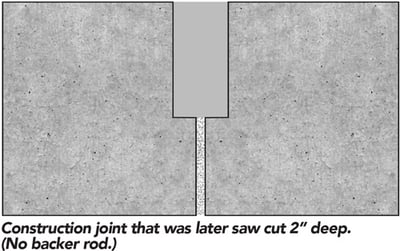 Joint fillers are designed as a structural component. They absorb the impact of hard-wheeled traffic (forklifts and pallet jacks). They protect the joint edges. To work properly, they should be installed to the full depth of the control joint saw cut or at least the top 2 inches of a construction joint.
Yes, using backer rod can save you money on installation cost, but it will bite you in your hind quarters eventually. Joint fillers do not stretch. They are designed with low adhesive strength (aka bond strength) and low cohesive strength (aka tensile strength) so that they won’t weld the concrete together. Saw-cut joints (aka control joints) are there for a purpose – to allow for thermal expansion and contraction of the concrete. Joint fillers are designed to de-bond or crack if the concrete moves too much. This is not a failure of the material, but rather a built-in safety mechanism.
If you install a joint filler properly (full depth), it will rest on the shoulders at the bottom of the saw cut and will not push down into the joint (unless you ignore my advice and use backer rod). It will absorb the impact of hard wheel traffic and protect the joint edges. We chose to develop a polyurea hybrid material that cures in seconds. You can overfill the joint slightly, then shave off the top flush with the concrete in a matter of minutes. Powerful, painless, rapid.
Quick Reference:
Joint Sealer: Exterior use, high flexibility, installed in hourglass shape using backer rod, and prevents water intrusion beneath a concrete slab.
Joint Filler: Interior use, low flexibility, installed full depth (normally don’t use backer rod), and protects the edges of the concrete joints from chipping and spalling.
Joint Filler Product: AP Joint Fill 800. Available in 10 gallon units or 22 ounce dual cartridges.
Want more information on Alchemy-Spetec floor repair products?

 Finally! We are at the last basic step. Now for the fun part - injecting the polyurethane resin. If you only have one pump, be sure to flush the pump out completely with

 All cracks that aren’t actively leaking at the time you are sealing them need to be flushed out with water. Flushing them gives you several advantages:
 Installing high pressure injection ports is pretty straight forward, so I won’t spend too much time on this topic. Just a few quick tips.
 Here it is. My favorite topic. Why? Because I have seen and heard some really stupid things concerning this. It is my pet peeve. It separates the technicians who care from those who are only going through the motions. And quite frankly, it can be the difference between a successful outcome and dismal failure - or at the very least an expensive call back.
 Let’s face it, most of the structures you drill through will be full of rebar. Rebar is the steel reinforcement that gives the structure its strength. Concrete protects the rebar by shielding it from moisture, and the high pH of concrete keeps the rebar from rusting. However, once a crack forms it allows more water and environmental gasses to reach the area surrounding the rebar. Carbonation of the concrete can now occur which causes the pH to drop and the corrosion process to begin. The rust expands and takes up 15 times the volume of the un-corroded steel which causes tensile forces to work against the concrete eventually resulting in additional cracking and spalling. Hopefully, you will be called in to fix the leaks before much of this damage occurs.
 I remember my first day on the job back in June of 1985. We were working nights in the MARTA subway tunnels in Atlanta, sealing leaks in the ceiling. They handed me a 30 pound hammer drill and told me to drill holes in the ceiling at a 45 degree angle. Sure, what the heck is a 45 degree angle? I put on a lot of muscle that summer drilling overhead and hauling 50 pound pails of resin all over the Southeastern U.S.
 There are five basic steps to be done when injecting a crack in concrete that is leaking water. This is crack injection 101. Learn these steps and you will be well on your way to understanding what it takes to seal a water leak in concrete with products such as
 Product

 Old Packaging
-1.png?width=560&height=315&name=design%20(1)-1.png)
