
 Let’s face it, most of the structures you drill through will be full of rebar. Rebar is the steel reinforcement that gives the structure its strength. Concrete protects the rebar by shielding it from moisture, and the high pH of concrete keeps the rebar from rusting. However, once a crack forms it allows more water and environmental gasses to reach the area surrounding the rebar. Carbonation of the concrete can now occur which causes the pH to drop and the corrosion process to begin. The rust expands and takes up 15 times the volume of the un-corroded steel which causes tensile forces to work against the concrete eventually resulting in additional cracking and spalling. Hopefully, you will be called in to fix the leaks before much of this damage occurs.
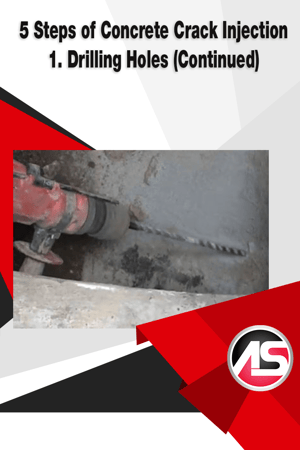
Once you are on the jobsite, this slow process of decay does not really affect you (unless the concrete is spalling off as you drill). Your issue with the rebar is that it will stop your drill bit from penetrating the crack. The cracks will often follow the rebar, especially if there is not an adequate coverage of concrete over the rebar. Shallow rebar is a huge contributing factor to cracks in concrete.
At this point, all you care about are two things. First, how do you know if you have hit rebar? Second, if you have hit it, what in tarnation do you do now?
After drilling many thousands of holes like I have over my career, you pretty much know when you have hit rebar. Here are a few things to lookout for:
- Forward progress of drilling has stopped.
- The sound of the drilling changes.
- The quantity of drilling dust is reduced.
- If you are not sure, put your hand out to catch some of the drilling dust coming out of the drill hole. Observe it for metal shavings.
- Move further away from the crack and try again (adjust your drilling angle).
- Move closer to the crack and try again (adjust your drilling angle).
- Move parallel to the crack and try again.
- Move to the other side of the crack and try again.
- As a last resort, drill straight into the crack. This is not the ideal situation, but if you can drill deep enough to get an injection port installed, then you might be able to successfully seal the leak.
Now that the surface of your concrete looks like Swiss cheese, it is time to go get that bag of fast set hydraulic cement you brought along for just this purpose. Try to patch it up before you begin injection because some of those abandoned holes are libel to have hit pay dirt. If you don’t seal them up then you will have foam or resin leaking out of the holes.
Hitting rebar is not fun and can be frustrating. The key is to expect it and try to think three dimensionally. See if you can visualize what is going on behind the concrete. This is one of the keys to becoming a really good injection technician.
Click below to read the previous articles in this series if you missed them:
5 Steps of Concrete Crack Injection - Overview
5 Steps of Concrete Crack Injection - 1. Drilling Holes
Click below to read next articles in this series:
5 Steps of Concrete Crack Injection – 2. Flushing the Holes
5 Steps of Concrete Crack Injection – 3. Installing the Ports
5 Steps of Concrete Crack Injection – 4. Flushing the Cracks
5 Steps of Concrete Crack Injection – 5. Injecting the Resin
Want in-depth info on crack injection procedures and products?

