Looking for a Contractor?

Alchatek Blog

Polyurethane Leak Seal Demo

Posted by Andy Powell on Sep 12, 2018 11:20:33 AM

Leaking concrete structures can be permanently repaired using a water activated flexible foam. Take a look at this video to see a polyurethane leak seal demo.

Leaking concrete structures can be permanently repaired using a water-activated flexible foam. Pressure injection of these liquid resins forces the material into leaking cracks, joints, and other defects where the resin rapidly reacts with water to form a flexible, water tight seal.

From hairline cracks to gushing leaks, virtually any of these defects can be repaired with our leak seal resins. Take a look at this polyurethane leak seal demo video.... 

Want more in-depth info on polyurethane leak seal?

Download an Info-Packed Leak Seal Brochure!

Topics: All Posts, Seal Leaks

How to Prevent Polyurethane from Staining Concrete

Posted by Stephen C. Barton on Aug 24, 2018 10:00:00 AM

AP Flush 125 is a concentrated product that you can mix with 3-5 parts water. It can be sprayed onto concrete, wood, metal, or plastic and creates a barrier layer that prevents polyurethane foam from sticking to and staining the surface. Read more...

AP Flush 125 is a concentrated product that you can mix with 3-5 parts water. It can be sprayed onto concrete, wood, metal, or plastic and creates a barrier layer that prevents polyurethane foam from sticking to and staining the surface. Read more...Over my many years of consulting with customers on jobs, I have pumped, shot, spilled, splashed, sprayed, poured and injected polyurethane foam into every imaginable type of concrete structure known to man. Most of it has ended up where it was supposed to go. But some of it did not.

Some of it ended up on my clothes, my skin, and my hair. That never bothered me (well, maybe the resin on that brand new button down shirt bothered me a little). What is really frustrating is when it stains the concrete you are trying to fix. Your job is to repair something for your customer, and if you are not careful, you can make it look worse than before.

A few years ago I asked our chemist to develop a water based solvent for cleaning out two component impingement style injection guns (such as our MixMaster Pro gun). I wanted the product to be water based so that it could be dispensed directly into the environment with no negative effects. I also needed it to be thick enough to push reacting foam out of the gun.

After I saw what he came up with, I realized it could probably be used as a barrier to prevent polyurethane from staining concrete. After a little testing and tweaking, I realized it would work.

AP Flush 125 is a concentrated product that you can mix with 3-5 parts water. It can be sprayed onto concrete, wood, metal, or plastic and creates a barrier layer that prevents polyurethane foam from sticking to and staining the surface. You can brush it on or spray it on with a pump up garden sprayer.

Our AP Lift customers spray it right out of the MixMaster Pro gun onto concrete surfaces as they are moving from injection point to injection point. They also saturate cracks and joints that foam may come out of. This has the dual protection of keeping stains off the concrete and helps reduce binding of the concrete that can impede the lifting process.

On hot, sunny days you may have to apply it again if the water evaporates out of the system, but overall it really works wonders. We have used it on lifting jobs, soil stabilization jobs, and leak seal jobs. Now the spray foam insulation contractors are starting to use it to protect surfaces adjacent to their work areas.

Next time you are using polyurethane foam on or near a surface you don’t want your foam to stick to or stain, try a pail of AP Flush 125. One pail of concentrate can give you up to 25 gallons of protection.

Want more in-depth info on procedures and products?

Download the Info-Packed Geotech Product Catalog!

Download the Info-Packed Leak Seal Product Catalog!

Topics: All Posts, Lift Slabs, Seal Leaks, Stabilize Soil

The History of Polyurethane and Chemical Grouting

Posted by Stephen C. Barton on Aug 22, 2018 10:00:00 AM

This history of polyurethane and chemical grouting contains a basic overview of how the technology has developed since it was invented in the 1930s.

This history of polyurethane and chemical grouting contains a basic overview of how the technology has developed since it was invented in the 1930s.After three decades in this industry, I still find myself in awe of what polyurethane foam can do.  From sealing massive dam leaks to stabilizing airport runway slabs to lifting entire buildings – the feats contractors achieve with this stuff is astonishing.  Yet some people who are new to this technology have a hard time understanding how a mere “foam” can be ideal for these most demanding of applications.  Or maybe they wonder how safe it is. 

The irony is, whether you think you are “new” to this technology or not – you’ve been surrounded by polyurethane all your life.  Sometimes an understanding of the past can provide more confidence for moving forward into the future.  So if you can’t quite grasp how “foam” has been developed to the point that it can lift a building – or you wonder how safe it is – pay close attention to this story.

Dr. Otto Bayer first made polyurethane foam in Leverkusen, Germany in 1937.  Polyurethane was initially used as a cheap replacement for rubber.  Widespread use began in World War II, when many other materials became scarce.  Polyurethane use quickly spread as a key component in many products, from specialized paper to protective military garments to gloss finishes and protective coatings.

In the 1950s, many companies such as DuPont, BASF, Dow, and Union Carbide started producing polyurethane for an even wider variety of applications including adhesives, insulation and foam upholstery cushions.  In the 1960s the Bayer company (no relation to Dr. Otto Bayer) exhibited an all-plastic car, parts of which were made with polyurethane. 

In the early 1970s, the introduction of polyurethane skateboard wheels as a replacement for the old metal ones completely revolutionized the sport, as the new wheels allowed for high impact activities such as jumping off of ramps.  In the 1980s, the first mass produced plastic-body automobile – the Pontiac Fiero – was made with the use of polyurethane technology.

Today polyurethanes can be found in an infinite amount of products including furniture, clothing, shoes, beds, moldings, etc.

In the 1960s, 3M Company in the U.S. and Takanaka in Japan both introduced polyurethane grouts.  3M’s product was called Elastromeric Sewer Grouting Compound.  As the name indicates, it was intended for use in underground utilities.  Takanaka’s product was called Takanaka Aqua-Reactive Chemical Soil Stabilizer (TACSS).  As the name indicates, it was intended for use in soil stabilization projects.  In the early 1980s, DeNeef obtained the rights to TACSS and began distributing polyurethane grout worldwide.  By the mid 1980s, there were almost a dozen manufacturers of polyurethane grouts.  I got my start pumping 3M 5600 to seal cracks in the Atlanta subway system back in 1985.  I was amazed at what it could do back then, and I am still amazed at what our products do today.  3M exited the business many years ago.

In the last few decades, polyurethane grouting has become a widely accepted method for sealing leaks, stabilizing soil and lifting slabs.  Many innovations have been made, including closed cell hydrophobic polyurethanes and the use of two-component foams in geotechnical engineering.  Polyurethane’s advantages over the old school approach of cement grout repair is covered thoroughly in our blog post Polyurethane vs. Cement for Slab Jacking.

Want more in-depth info on polyurethane and chemical grouting?

Download the Info-Packed Geotech Product Catalog!

Download the Info-Packed Leak Seal Product Catalog!

Topics: Repair Seawalls, All Posts, Lift Slabs, Seal Leaks, Stabilize Soil

Polyurethane Infrastructure Repair - Powerful, Painless, Rapid

Posted by Andy Powell on Aug 17, 2018 10:10:06 AM

In the blog post, we take a look at the three most important characteristics in a polyurethane infrastructure repair resin: powerful, painless, rapid.

In the blog post, we take a look at the three most important characteristics in a polyurethane infrastructure repair resin: powerful, painless, rapid.In a recent media interview, I was quoted as follows: “Ultimately, the customer is the property owner, somebody who’s got a problem. Even though we’re selling to contractors, we kind of all have to be on the same page.” That view has motivated us to pay close attention to what contractors, engineers AND property owners are most concerned about regarding the use of polyurethane. Over the years, we’ve noticed three main questions that arise over and over again:

  1. Are the polymers strong enough?
  2. Are they easy to install?
  3. How quickly can the job be finished?

So we’re going to take a look at each of these three core issues in detail…

Powerful Polymers

Concrete Leveling Foams

In my blog post Slab Jacking With Polyurethane Foam – How Strong is Strong Enough?, I point out that the National Home Builders Association and the International Building Code list stiff clay as having a 4,000 lbs per square foot load bearing capacity and crystalline bedrock as having 12,000 lbs per square foot capacity. Our lifting foams have load bearing capacities of 7,200 to 14,000 lbs per square foot after curing in a free rise state. 

When Alchemy-Spetec foams cure in a confined state underground, that bearing capacity has been known to be even stronger. Testing data in the lab shows that our lifting foams will increase in compressive strength: In a space confined 25% by volume there will be an increase of 31% in psi and in a space confined by 75% there will be a 79% increase in the psi.

The Alchemy-Spetec lifting foams are used to level airport slabs supporting jumbo jets, heavy equipment, building slabs supporting tremendous loads, and even railway slabs supporting the heaviest freight trains.

Leak Seal Resins

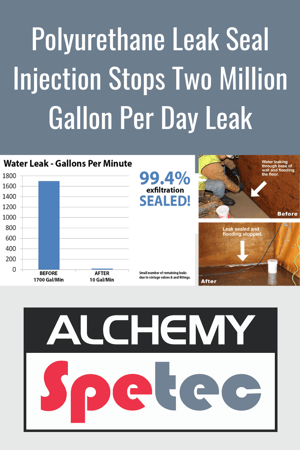
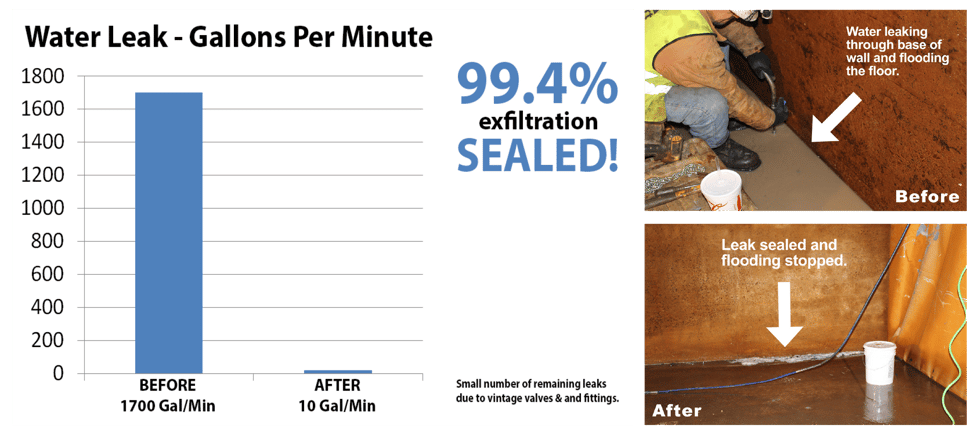
Alchemy-Spetec leak seal resins have been used in many applications, including shutting down a 2-million gallon per day leak at a water treatment plant. The leak was reduced from 1,700 gallons per minute to just 10 gallons per minute (attributed to the many vintage valves and fittings that are still present at the plant). They are also used in other applications such as curtain wall grouting.

Soil Stabilization Resins

Unstable, eroded, or loose soil around infrastructure can result in settlement and damage to the structure. Voids can be filled, seawalls remediated, soil consolidated, and water migration halted by injecting the soil with Alchemy-Spetec soil stabilization resins. In my blog post Soil Stabilization Products Prevent Cave In Beneath Busy Intersection, I profiled a powerful example of AP Fill 700 in action. Inspectors in Orange County, Florida found a depression in the middle of a busy intersection that was due to an underground sewer line that wasn’t sealed. Water and eroding soil were infiltrating the sewer line causing the road to slowly settle. The resulting voids around the drainage structures had the potential to grow larger, eventually resulting in a complete cave-in of the roadway. A point repair was done from within the leaky pipe to stop the infiltration but they feared it was only a matter of time before the road gave way. We devised a solution for their crew to use the versatility of AP Fill 700 as both a permeation and void filling grout.  To keep the lane closure down to a bare minimum of time, the project was successfully completed on two separate Saturdays. The voids were filled, the loose soil was solidified, and only minor asphalt patching was required to make that area smooth for traffic again.

Orange County Utilities Supervisor Paul Morrison has been enthusiastic about AP 700 since the first time he tried it out on a severe manhole leak, when he had this to say…

“Based on our extensive prior experience, we expected to use at least five to ten pails to stop this leak. With Alchemy-Spetec material we were able to do the job with 1/10th of that amount. Their product will save our crews a lot of time and labor, and save the taxpayers of Orange County a lot of money.”

AP Soil 600 is one of the most versatile permeation grouting products on the market. It can be characterized by its single component, moisture activated, hydrophobic, and low viscosity qualities. It can fortify sandy soil to strengths approaching 2,000 psi.

Painless Procedures

As I never fail to point out, application procedures for Alchemy-Spetec products are relatively painless. The installation process is very clean compared to replacing the structure or repairing with cement grout.  Polyurethane is lighter than cement, so it doesn’t sink. Alchemy-Spetec products do not shrink after installation. The closed cell structure makes these resins impermeable. 

Rapid Results

Application of polyurethane is usually less expensive than replacement. Polyurethane concrete repair is also less time consuming. Any structure repaired with Alchemy-Spetec products is usually ready for use 45 minutes after application.

There you have it – the three most critical issues for contractors, engineers and property owners regarding polyurethane concrete repair. By staying focused on these concerns we constantly remind ourselves WHY we do what we do. We do it for YOU.

Want in-depth info on polyurethane infrastructure repair resins?

Download the Info-Packed Geotech Product Catalog!

Download the Info-Packed Leak Seal Product Catalog!

Topics: All Posts, Lift Slabs, Seal Leaks, Stabilize Soil

Powerful Polymers, Painless Procedures and Rapid Results

Posted by Andy Powell on Aug 17, 2018 9:30:25 AM

As a technical consultant, I often assist customers when they're put to the test with difficult jobs. That's why we go out of our way to provide the powerful polymers and painless procedures they need to achieve the rapid results those projects require. For an in-depth dive into what we mean by powerful, painless and rapid - see this blog post I wrote awhile back. Then watch the video below to see powerful polymers, painless procedures, and rapid results in action... 

Want more in-depth info on Alchemy-Spetec products?

Download the Info-Packed Geotech Product Catalog!

Download the Info-Packed Leak Seal Product Catalog!

Topics: Repair Seawalls, All Posts, Lift Slabs, Seal Leaks, Stabilize Soil

Spetec PUR H100 Hotshot Cartridge

Posted by Charlie "The Grout Geek" Lerman on Aug 3, 2018 10:11:18 AM

The Spetec PUR H100 Hotshot Cartridge contains one component, closed cell, hydrophobic, water reactive, solvent/phthalate free, low viscosity polyurethane injection resin for stabilization and water cut-off of large water leaks. The cartridge packaging is ideal for small jobs in locations that prohibit the use of pumps.

The Spetec PUR H100 Hotshot Cartridge contains one component, closed cell, hydrophobic, water reactive, solvent/phthalate free, low viscosity polyurethane injection resin for stabilization and water cut-off of large water leaks. The cartridge packaging is ideal for small jobs in locations that prohibit the use of pumps.The Spetec PUR H100 Hotshot Cartridge contains Spetec PUR H100, a one component, closed cell, hydrophobic, water reactive, solvent/phthalate free, low viscosity polyurethane injection resin for stabilization and water cut-off of large water leaks. The cartridge packaging is ideal for small jobs in locations that prohibit the use of pumps.

Advantages:

  • Single component cartridge.
  • Good compression strengths.
  • Rapid set time.
  • No volatile solvents.
  • Cures to rigid foam.

Applications:

  • Water cut-off.
  • Dams.
  • Manholes.
  • Storm pipe joints.
  • Box culverts.
  • Limited access areas.

For details on preparation, application instructions, required tools and more, please download this Spetec PUR H100 Hotshot Cartridge datasheet.

Want more information on Alchemy-Spetec leak seal products?

Download an Info-Packed Leak Seal Brochure!

Topics: All Posts, Seal Leaks

Building a Leak Seal Methodology Part 4 - Applying Products - Injecting Cracks & Joints

Posted by Jim Spiegel on Aug 1, 2018 9:58:50 AM

Chemical grouts are commonly injected into leaking cracks and joints to stop the flow of water, sealing off cracks and filling voids. This procedure can be performed in both wet and dry situations, in potable water or wastewater tanks, and in a variety of other structures where water is leaking. Read more...

Chemical grouts are commonly injected into leaking cracks and joints to stop the flow of water, sealing off cracks and filling voids. This procedure can be performed in both wet and dry situations, in potable water or wastewater tanks, and in a variety of other structures where water is leaking. Read more...Chemical grouts are commonly injected into leaking cracks and joints to stop the flow of water, sealing off cracks and filling voids. This procedure can be performed in both wet and dry situations, in potable water or wastewater tanks, and in a variety of other structures where water is leaking.

Procedure

Identifying and Preparing the Structure

  • Clean crack surface using a wire brush, a grinder with wire cup wheel or other mechanical means, to remove mineral deposits, coatings or other debris. Pressure washing of the surface is also an option. If sever contamination exists, a chemical cleaner may be used, but must be flushed or neutralized before proceeding to the next step.
  • When addressing wide cracks, use Oakum, hydraulic cements or epoxy gels as a surface seal over the crack prior to injection to contain chemical grout in the structure. When addressing high flow leaks, use Oakum soaked in chemical grout. Soak oakum in chemical grout and insert into the leaking crack or joint with a screw driver or similar tool. This will slow the water flow.
  • pH notice: water used to activate Alchemy-Spetec chemical grouts must be in the pH range of 3-10 to achieve optimum performance.

Injection Port Spacing and Drilled Holes

  • Port spacing is determined by the width of the crack: 3-4 inches apart in tight cracks and up to 24 Inches apart in wide cracks. Staggering ports from side to side (stitching) is always recommended.
  • To intersect a crack at the mid-point, drill injection port holes toward the crack at a 45-degree angle, at a distance of one-half the thickness of the concrete. Example: In 12-inch-thick concrete, drill the injection port hole 6 inches back from the crack at a 45-degree angle to ensure crack is intersected at mid-point (longer drill bits may be needed to reach mid-point). See Diagram.
  • Drilled holes should intersect the crack or joint at the midpoint, so the chemical grout can enter the crack in the center of the concrete and expand in both directions sealing the entire crack, filling any voids and micro cracks in the structure as the material expands and cures.
  • Drilling injection holes is commonly performed using 3/8, ½, or 5/8-inch diameter drill bits.
  • Flush drilled holes with clean water to remove dust and debris before inserting drive in port or mechanical packer.

Installing Injection Ports / Packers

  • Various types of drive in ports and mechanical packers are available in the market.
  • Drive in ports should be driven/hammered into the drilled hole until snug.
  • Once the port is snug in the hole, insert a grease or zerk fitting into the port. Insert mechanical packers into the drilled holes until the top of rubber sleeve is just below the concrete surface.
  • Tighten the packer using a wrench or ratchet, turning clockwise until firm. Do not over tighten.
  • Install each port before injection but leave the grease coupler/zerk fitting off so you can monitor the travel.
  • Avoid hammering on the grease coupler/zerk fitting.

Equipment and Equipment Set Up

  • When using chemical grouts that are water reactive, use two separate pumps: one for water and the other for chemical grout. Caution: Never allow water to enter the chemical grout pump.
  • Flush out the chemical grout pump and lines prior to use with an approved pump cleaning agent. This will ensure that the pump has no moisture in the system. Repeat flushing procedures when injection operations stop for a prolonged period of time.
  • Pump hoses should be equipped with a high-pressure ball valve assembly. This allows easy connection to the injection port and an on-off grouting operation.
  • Keep injection pump pressures low at the beginning of injection and increased slowly as needed to achieve full grout penetration. Extra high pump pressure may result in cracking or spalling of the concrete.

Flushing the Crack Prior to Injecting

  • Flush the crack prior to injecting chemical grout to ensure that the crack is free of debris, that injection ports have intersected the crack, and that there’s enough water to cause the resin to react.
  • Begin injecting water at the lowest port on vertical cracks or at one end (and then work across) on horizontal cracks. Continue injecting water until the crack has been flushed and clean water appears.

Injection of Chemical Grout

  • Inject the liquid (catalyzed) resin into the injection packer.
  • When injecting a vertical crack, start at the bottom and work upward as the material seals the crack.
  • When injecting a horizontal crack, start at one end and work across the crack.
  • REMEMBER: Keep pump pressures low at the beginning of the injection process and increase slowly as needed to achieve full grout penetration. Extra high pump pressures may result in cracking or spalling of the concrete.
  • Inject at a rate that allows material to travel and completely seal the crack. Once you see material seep out at the adjacent port, pause injection and insert a grease coupler/zerk into that port. Then resume injection on the existing port.
  • Advance to the next port when movement of material has stopped on the existing port, or when material is exiting the crack at an excessive rate.

Completion and Clean-up

  • After fully injecting the crack with chemical grout, attempt to re-inject water into each port to ensure that the crack and drilled holes have been completely sealed.
  • Next, remove each injection port/packer by pulling the port/packer out of the structure, or by drilling them clear to below the surface by 3 inches or more.
  • After removing the ports/packers, fill the injection holes with hydraulic cement, non-shrink grout or epoxy gel material.
  • Remove any wasted cured resin, used ports/packers, and construction debris.

COMMON MISTAKES TO AVOID

  • Drilling too close to the crack can cause spalling of concrete.
  • Drilling too close to the crack will not allow material to seal entire crack, which can result in re-occurring leaks.
  • Injection of cracks with manual equipment (ex. grease guns) will not produce enough volume and may cause extreme waste and injection failure.
  • Poor preparation of wider cracks may cause material waste, lea–ding to re-occurring leaks.
  • Injection pump pressure which is too high can cause spalling and damage to the surface.

Chemical grouting for leak-seal applications can provide contractors a specialty repair service that will always have relevance and demand in below-grade structures and water-holding structures. By following these steps for product, packer, and pump selection, you will be on the right path to a successful leak-seal repair. For more details and information on the leak-seal methodology, please contact a knowledgeable Alchemy-Spetec team member.

Want more information on building a leak seal methodology?

Download an Info-Packed Leak Seal Methodology Brochure!

Topics: All Posts, Seal Leaks

Building a Leak Seal Methodology Part 3 - Choosing Pumping Equipment

Posted by Jim Spiegel on Jul 30, 2018 11:01:06 AM

Chemical grouting for leak-seal applications can provide contractors with a specialty repair service that will always have relevance and demand in below-grade structures and water-holding structures. For most polyurethane injection resins, single component high-pressure piston pumps are required. Read more...

Chemical grouting for leak-seal applications can provide contractors with a specialty repair service that will always have relevance and demand in below-grade structures and water-holding structures. For most polyurethane injection resins, single component high-pressure piston pumps are required. Read more...Once the material is selected, an appropriate piece of equipment must be selected for dispensing the material. For most polyurethane injection resins, single component high-pressure piston pumps are required. These are typically electric airless design, but can also be pneumatic, drill-operated, or hand powered. Alchemy-Spetec offers the full line of Titan pumps with various ranges of pressure and volume. The Titan 440 is a good pump for small injections, or to act as a water flush pump to clean drill holes and to ensure drill hole intersects the crack or joint. For higher outputs, it is recommended to use the Titan 640 or PowrTwin 8900. These pumps will be much better equipped for large volume applications such as curtain grouting, or for single component soil injection applications. For small cracks and joints, Alchemy-Spetec offers the Drill Pump. The Drill Pump is drill-operated and capable of handling pressures as high as 5000psi. It is easily maintained and produces very minimal waste due to the small hopper size and mixed batches. For acrylic injections, a stainless-steel pump, the Alchemy-Spetec Gel Pump is required. Due to the oxidizing nature of the B-side sodium persulfate, stainless equipment is required. 

The coupler at the end of the hose set will be dependent upon the type of zerk fitting discussed in part 2 of this blog series. A button-top valve requires a sliding coupler, the Alchemy-Spetec ACP-2204, or the standard zerk coupler, ACP-2201. It is always recommended to have several couplers on-site as the injection grouts will eventually cure in the couplers and prohibit the passage of material. It is also recommended to keep a spare piston kit or packing kit for any pump and to have received training on the appropriate replacement technique should it need to be changed. 

Chemical grouting for leak seal applications can provide contractors a specialty repair service that will always have relevance and demand in below-grade structures and water-holding structures. By following these steps for product, packer, and pump selection, you will be on the right path to a successful leak seal repair. 

Want more information on building a leak seal methodology?

Download an Info-Packed Leak Seal Methodology Brochure!

Topics: All Posts, Seal Leaks

Building a Leak Seal Methodology Part 2 - Choosing Packers

Posted by Jim Spiegel on Jul 27, 2018 9:55:59 AM

While leak-seal injections are often performed in small cracks and joints, the mechanical packer portion of the project is often more significant than the chemical grout. Let’s begin with a brief overview of packer terminology as reference.

While leak-seal injections are often performed in small cracks and joints, the mechanical packer portion of the project is often more significant than the chemical grout. Let’s begin with a brief overview of packer terminology as reference.Mechanical packers and ports are used on almost every leak seal chemical injection project. If a contractor is using chemical grout, then there is a high chance that they are also using mechanical packers.  Considering that leak seal injections are often performed in small cracks and joints, the mechanical packer portion of the project is often more significant than the chemical grout. Let’s begin with a brief overview of packer terminology as reference.

Several suppliers offer 2-3 standard mechanical packers and ports assuming that these are generic in design and commoditized. This assumption is incorrect. Not all mechanical ports are created equal, and we aim to define these functional differences in this brochure.  Mechanical packers are most commonly defined by four key aspects; and these are Diameter, Length, Type, and Ball-Valve Location.

Let's examine the functional differences of these key aspects. 

Diameter: Mechanical packer diameter is relevant for two reasons, 1) this dictates the size of the drill hole required, and 2) the overall surface area of the rubber in the drill hole is a key contributor to the pressure tolerance of a mechanical packer. 

  1. Size of drill hole considerations: Industry standards require 45-degree drilling to insert mechanical packers to a crack depth that is ½ the thickness of substrate.For thin substrates, for example 6” thick slabs, drilling at a 45-degree angle with a 5/8” drill bit may cause spalling and damage to the surface above the drilled angle as the outward heave force from the passage of the drill is greater than the strength of the concrete at that location, resulting in concrete spall and cracking damage at that location. For these applications, Alchemy-Spetec offers 5/16” (8mm) and 3/8” (10mm) diameter packers. The smaller cross section of drilling produces much less heave force against the face of the concrete and offers much better results when drilling into a thin concrete substrate. Post-tension structures and/or structures with a significant amount of rebar also present an obstacle when drilling. By reducing the size of the drill bit by 40-50%, the contractor also decreases the probability of drilling into rebar or post-tensioning accordingly.

  2. The tradeoff for smaller diameter is a decrease in pressure tolerances. Common ½” (13mm) or 5/8” (16mm) mechanical packers tolerate spikes in pressure greater than 4,000psi. At 4,000psi, packers and ports can present a significant job-site hazard as they can exit the drill hole at dangerous velocities. While injecting at these pressures are never recommended, a ½” (13mm) or 5/8” (16mm) rubber base on the mechanical packer will prevent blow-out significantly better than the 5/16” (8mm) or 3/8” (10mm) counterpart. 

Length: Mechanical packers are most commonly used in poured concrete substrates. In adequately consolidated poured concrete structures, the drill hole itself acts as a channel through which the chemical grout will travel as it reaches the cross-section of the crack or joint. In these conditions, only the entire rubber shaft of the mechanical must be recessed into the drill hole to create an adequate compression seal. In the example of a 3” long packer, this would leave approximately 1.5” of metal shaft for connection access from the coupler that connects the hose line to the mechanical packer. However, it is common to experience micro-spalling at the point of drilling as the drill catches the 45-degree drill line. In these cases, the packer must be set even further into the concrete to ensure the rubber is fully recessed into the drill hole. This condition decreases the length of shaft accessible at the face of the substrate for connection to the coupler and can present challenges for the applicator. For this reason, it is advised to utilize 4” or 6” long packers in deteriorated or defective concrete substrates.

Length can also be advantageous when the contractor is attempting to inject the material to a specific point within the substrate. For example, it may be desirable to deliver chemical grout to the backside of a 4” substrate, or to a certain depth for a pipe penetration, or to account or unknown consolidation of the concrete within the drill hole channel that could lead to lateral travel of chemical grout to undesired locations within the substrate. Each job-site and substrate condition is different, and length of mechanical packer can provide the contractor with more options and ultimately a more effective delivery of chemical grout.

Type: Mechanical packers come in many types. In the concrete repair industry, contractors will find plastic, steel, brass, aluminum, zinc, and other metal alloys. The most commonly used type is steel. Steel offers the benefits of strength and resistance to oxidation through chemical grout oxidizing components found in grouts such as acrylics.  Brass and aluminum packers are weaker and allow for the shaft to be broken off by hammer for more timely patching efforts following injection. However, most Quality Control Managers and clients will require the removal of all metal from the substrate prior to patching. The chosen method of removal is the choice of the client and/or design professionals.

There are two types of plastic packers used. The 5/8” (16mm) button top packer is used for high volume applications and for applications in which a button-top coupler is preferred to minimize leakage. The free-floating ball in the middle of the packer acts as an anti-return valve. A 5/8” (16mm) plastic sleeve is inserted first, with the threaded plastic base then screwed into compression via the hex head top. Another common port used is the 3/8” (10mm) plastic bang-in, or hammer-in port. These ports are simply inserted into a 3/8” (10mm) drill hole aided by the force of a hammer. The soft nature of the plastic allows the concrete to bite into the sides of the packer creating a compression seal. Because plastic packer compression is achieved though plastic to concrete friction, the overall pressure tolerances are typically lower than that of the mechanical packer counterpart.

Aluminum packers have recently become more prevalent in the industry due to the combination of economical pricing with the benefits of mechanical packer pressure tolerances. Due to the softness of the components, however, these packers have been known to strip threads at times. All functionality considered, aluminum packers do offer a reasonably price alternative to the steel mechanical packers.

Alchemy-Spetec continues to offer a popular heavy-duty ½” (13mm) and 5/8” (16mm) packer with a soft grade of rubber and washer on the top of the packer that adds extra friction and bite to the concrete when tightened. The heavy-duty packer offering is in steel. These heavy-duty packers are top-mounted ball-valve style and can be converted to button-top valve (see next section and below).

Ball-Valve Location: Perhaps the most misunderstood functionality of mechanical packer design is the ball-valve placement. The ball-valve placement is important because this is the functional element that keeps chemical grout in the substrate as it reacts and creates the density required to adequately seal the substrate. It is an applicator error to remove the packers prior to full product cure. Top-mounted zerk-valve packers allow for port-to-port travel observation. Port-to-port travel is injecting one packer until chemical grout is observed exiting the next packer which does not have an anti-return zerk-valve installed. Once the material is observed coming out of the next packer, the zerk-valve can be installed, and the process repeated. This is only possible with top-mounted ball-valve placement. Another benefit of the top-mount packer is the ability to replace the standard zerk-valve with a button-top-valve. Button top valves, as mentioned above, minimize leakage with a more secure connection to the packer that doesn’t allow the coupler/packer connection to flex.

Bottom-mount ball-valves are less common in the industry. The main benefit of bottom-mount ball-valves is the immediate removal of the top shaft following injection, and subsequent patching of the drill hole with the ball-valve still in the substrate. Bottom-mount ball-valve packers commonly have a bit more leakage and excess chemical grout as the shaft, above the ball-valve, is full of unreacted and unconfined chemical grout.

Alchemy-Spetec supplies a complete offering covering all of the functionalities detailed in this brochure. All top-mount options can be converted to button-top style with by adding the equal quantity of Button-Top Fittings, ACP-2203.

Want more information on building a leak seal methodology?

Download an Info-Packed Leak Seal Methodology Brochure!

Topics: All Posts, Seal Leaks

Building a Leak Seal Methodology Part 1– Choosing Products

Posted by Jim Spiegel on Jul 25, 2018 12:27:51 PM

The most critical step of building a leak seal methodology is choosing the correct product. In our industry, there are products with varying degrees of flexibility, viscosity (thickness), expansion rate, type, and reaction time.  If the wrong product is chosen, the best equipment in the world won’t provide a successful, long-lasting repair. Read more...

The most critical step of building a leak seal methodology is choosing the correct product. In our industry, there are products with varying degrees of flexibility, viscosity (thickness), expansion rate, type, and reaction time.  If the wrong product is chosen, the best equipment in the world won’t provide a successful, long-lasting repair. Read more...

The most critical step of building a leak seal methodology is choosing the correct product. In our industry, there are products with varying degrees of flexibility, viscosity (thickness), expansion rate, type, and reaction time.  If the wrong product is chosen, the best equipment in the world won’t provide a successful, long-lasting repair.

Flexibility is very important in product choice as substrates that experience thermal expansion and contraction or dynamic loading causing movement, will require a flexible grade chemical grout (AP Seal 500, Spetec PUR F400) to remain sealed during movement. For curtain wall grouting or in joints and cracks that do not experience much movement, more rigid products (Spetec PUR H100, Spetec PUR HighFoamer, AP Fill 700) with higher expansion rates can get the job done. While flexible products do not offer the amount of compressive strength as their more rigid counterparts, the flexible functionality serves dynamic crack leak seal injection well.

Hairline cracks and cold joints require relatively thin (low viscosity) materials to penetrate adequately. Acrylic products offer the thinnest options (Spetec AG100 and Spetec AG200), while most of the Alchemy-Spetec single part polyurethanes also offer thin enough material to penetrate most concrete cracks and joints (Spetec PUR H100 and Spetec PUR F400). A common mistake, however, is choosing a product that is too thick resulting in excessive pressures and blow-outs. A common warning sign during injection is when pressures are continuously high, while very little chemical grout travel is observed. 

Most single part, catalyzed, water-reactive polyurethane grouts are expansive in nature. The amount of expansion typically varies from approximately 5-40x original mixed volume. The amount of expansion is important in many applications as it will be a factor in the total amount of material used, overall cell structure, and capacity to cut-off active water leaks. Spetec PUR HighFoamer can achieve an expansion rate of 50x. This is particularly beneficial when cutting off high-volume leaks and/or when performing curtain grouting. Expansion can create a significant amount of pressure behind a structure, so it is always advised to consider this behavior when injecting into a completely confined substrate.

Most leak seal chemical grouts are polyurethane-based, and hydrophilic or hydrophobic in type. Hydrophobic polyurethanes require water to initiate but are completely insensitive to moisture post-cure. These products are ideal for freeze/thaw and wet/dry cycles. Hydrophilic polyurethanes will expand and contract based on the amount of water in their environment. These products are ideal for applications in which there is constant water contact to keep them in their gel state. Hydrophobic polyurethanes include Spetec PUR H100, Spetec PUR F400, Spetec PUR F1000, Spetec PUR HighFoamer, and AP Fill 700. Hydrophilic polyurethanes include Spetec PUR GT350, AP Seal 500, and the acrylic grouts Spetec AG100 and Spetec AG200.

Reaction time plays a crucial role in the overall injection process as it will determine how fast the product will cut off water and also how far the product will travel. Most hydrophobic polyurethanes offer a catalyst component that can be used to control this speed. Depending on severity of leak, and thickness of structure, the catalyst can be adjusted accordingly to ensure that the product reacts when and where it is designed. Most polyurethane hydrophilic grouts do not offer catalyst components. Acrylic hydrophilic reaction times can be adjusted by adjusting the sodium persulfate concentrations on the B-side of the mix. The TEA component on the A side can also be adjusted, but for user-friendliness and simplicity’s sake, it is recommended to only adjust the sodium persulfate component.

Want more information on building a leak seal methodology?

Download an Info-Packed Leak Seal Methodology Brochure!

Topics: All Posts, Seal Leaks