Looking for a Contractor?

Alchatek Blog

Can I Use Hydroactive Grouts in Dry Conditions?

Posted by Jim Spiegel on Mar 23, 2018 10:20:40 AM

Hydroactive Grouts- banner.png

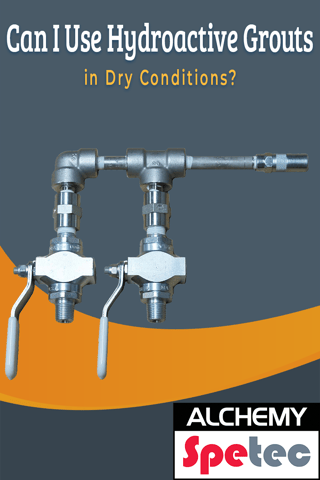
Hydroactive Grouts- BLOG.pngHydroactive chemical grouts, by definition, require hydrogen molecules from water to initiate the polymerization reaction.  Typically, an ISO component is catalyzed by an amine, but this solution will remain unreacted until it comes in contact with hydrogen.  All of the contractors out there familiar with chemical grouts are familiar with the ‘skin’ on the top of a catalyzed batch.  This is simply the top layer of the catalyzed batch showing signs of initiation just through contact with moisture in the air.  For injection into active leaks, these products are a slam dunk.  But what happens when you get to the job, and there is no leak where there was one just a few days ago? 

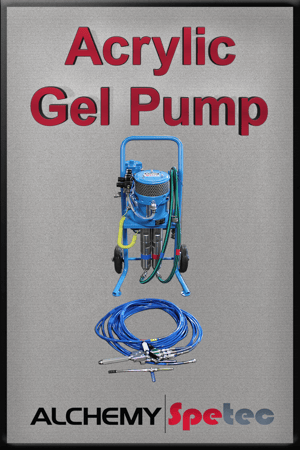
Most manufacturers will provide the generic answer of ‘just introduce water.’  And in layman’s terms, this is accurate.  But what is the CORRECT way to introduce water?  Twin streaming through an F-Valve Assembly is perhaps the most proven technique to ensure adequate and thorough activation of hydroactive grouts.  An F-assembly is an applicator apparatus designed specifically for twin streaming multi components.  This can easily be achieved through the use of two pumps, one designated for water and another designated for chemical grout.  This will also prevent the leaking resin phenomenon sometimes observed following mechanical packer removal. 

Alchemy-Spetec supplies F-assemblies and the following hydroactive grouts: Spetec PUR H100, Spetec PUR F400Spetec PUR F1000, Spetec PUR H40, AP Fill 700, and AP Soil 600.  For application recommendations and guidance, call an Alchemy-Spetec consultant now at 404-618-0438.  Don't rely on suppliers who simply promise a universally easy application process.  Lean on the suppliers who teach you how to navigate the unique challenges that each job site inevitably presents. 

Want more information on Alchemy-Spetec hydroactive grouts?

Download the Info-Packed Geotech Product Catalog!

Download the Info-Packed Leak Seal Product Catalog!

Topics: Equipment & Accessories, All Posts, Seal Leaks, Stabilize Soil

Injection Project Checklist

Posted by Charlie "The Grout Geek" Lerman on Mar 2, 2018 11:34:53 AM

injection-banner.png

injection-blog (2).pngWhen you set out to work on a leak seal injection project, it's important to be prepared. 

Let's imagine you have a big polyurethane grout injection job today. Great, let’s go!

Everything starts going into the truck and you’re off. You get to the job, start pulling material, equipment, tools and a lot of other stuff out of the truck - then someone asks, “Where is the______? And where is the _______? And what happened to the _______?"

Suddenly it’s time to find the nearest hardware store, so you can get what you need, so you can get your job started and finished and cleaned up after you’re done. When you're not prepared, one trip to the hardware store is usually only the beginning. Sometimes multiple trips are necessary to get the project done.

The Boy Scouts always talk about the importance of being prepared. Here is a little help. Make a checklist to be sure you have what you need, so you can get to the job…..get started……..and get it done (without holding up work because someone needs to go to the hardware store).

Here is a suggested starter list. Add to it whatever else you think you may need:

Equipment Materials Safety Wear Clean up
Pumps (parts) Injection resin (s) Safety Glasses  Garbage bags
Hoses Accelerator (s) Hard Hats  Hand cleaner
Buckets Clean water Safety Vests Rags
Injection wand (F-Valve) Pump Flush Rubber Gloves   
Zerk fitting adaptor  Cement patch or plug    
Extension cords(3)      
Hammer Drill      
3/8” drill bits      
Flashlights      
Tool box / bag  (stocked)      
Teflon Tape      
Bag of injection ports      
Batteries      
5/16” nut driver      

Before you pack up for a job, it's critical to make a checklist of what you need. Check it twice (like Santa does) to make sure you have everything squared away up front. 

Want more information on leak seal crack injection?

Download an Info-Packed Leak Seal Brochure!

Topics: Equipment & Accessories, All Posts, Seal Leaks

What Mechanical Packers Does Alchemy-Spetec Offer?

Posted by Jim Spiegel on Feb 23, 2018 11:06:58 AM

mechanical packer-banner (4)-1.png


mechanical packer-blog (3).pngContinuing on from the previous overview of
Mechanical Packers and Ports, let's take a closer look at all of the required mechanical ports and accessories you could possibly need for your next chemical injection project.

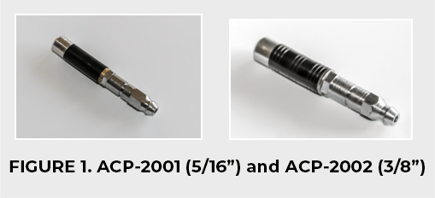
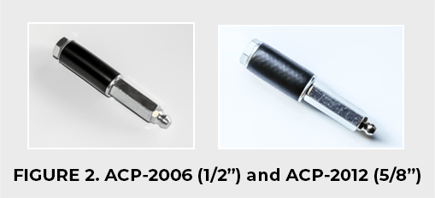
The product line is comprised almost entirely of the most versatile steel mechanical packers compatible with practically all of the chemical injection grouts supplied on the market. These steel packers are offered in bottom-zerk and top-zerk style, allowing for customization and familiarity on site for all contractor preferences of technique and clean-up. All top-zerk configurations are interchangeable with button head clutch-couplings that prohibit excessive leakage which is ideal for finished or pristine spaces, or overhead applications. Alchemy-Spetec also supplies the required couplers that connect the anti-return valve to most standard industry hoses. For custom fittings, please consult your local pneumatic or hydraulic parts supplier.

Other common industry offerings are also available in zinc and aluminum designs, which offer variances in weight, price point, and chemical resistances. Plastic bang-in types are available in 3/8” and 5’8” diameters, and are most commonly used on concrete slab-lifting and soil stabilization projects allowing for higher volumes of material to be pumped prior to reaction.

Alchemy-Spetec is also very pleased to bring back the high-pressure blue and red 5/8” and 1/2" diameter mechanical packers with a large washer on the top. An industry go-to packer for many years, these packers feature a specialty rubber allowing for even higher tolerances for pressure hold. Rounding out the accessory items offered by Alchemy-Spetec are flush wands to clear drill holes of debris, injection needles to point-inject behind oakum or existing sealants, and F-assemblies that permit the ultra-effective twin-streaming technique of pre-mixing water and hydro-active chemical grout.

Please take a few minutes to familiarize yourself with the Alchemy-Spetec Mechanical Packer and Accessories brochure (see download button below). Call us directly at 404-618-0438 for samples, pricing, and/or local distributor contact information.

Want more information on Alchemy-Spetec mechanical packers?

Download an Info-Packed Mechanical Packers Brochure!

Topics: Equipment & Accessories, All Posts

What is a Mechanical Packer?

Posted by Jim Spiegel on Feb 21, 2018 4:51:49 PM

mechanical packer-banner (2).png

mechanical packer-blog (1).pngThe term ‘Mechanical Packer’ probably doesn’t mean much to those not in the concrete repair industry. But for those close to chemical grouting, this term certainly brings about thoughts of both form and function. Mechanical packers are also referred to as ports, or more simply, packers. But we would like to be very clear that a port is not a packer.  

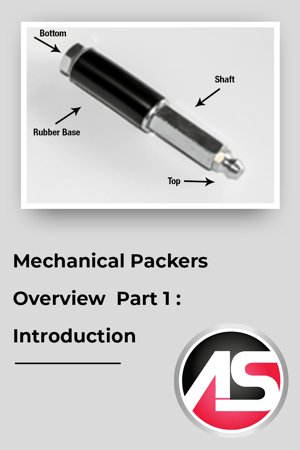
Mechanical packers were designed to withstand high pressure injection applications by inserting them into pre-drilled holes in a concrete substrate at various diameters ranging most commonly from 1/4" – 5/8”. Mechanical packers feature a rubber base with a threaded shaft. As the threaded shaft is tightened, the rubber base is compressed, creating a compression seal inside the drill hole. The ultimate pressure tolerance is dependent upon the amount the rubber is expanded and the total surface area of the rubber base that is in contact with the drill hole. That is, a smaller diameter packer will have considerably less surface area of rubber compressed against the concrete side walls, and thus holding a lower amount of pressure when connected to high pressure equipment. Most job site and substrate conditions will permit successful injection results with a diameter of 3/8” – 1/2".  Of course, some contractors have personal preference of smaller or larger sizes.  

Concrete packers also come in various types. Suppliers will market benefits of steel, brass, zinc, or aluminum. All things considered, steel packers tend to be the most versatile packers as they are compatible with all chemical grout types, while the brass, aluminum, and zinc can exhibit signs of deterioration when using oxidizing agents such as the salt component in a polyacryate gel. However, some contractors insist that the breakdown is not as quick as marketed by suppliers, therefore utilizing brass and aluminum packers in these applications as well.  

Each packer features an anti-return ball valve that is opened under pressure, allowing the passage of chemical grouts. Upon depressurizing, the ball valve will close, prohibiting the return flow of the injection resin out of the drill hole. This ball valve can be located on the top of the packer, in the base of the packer, or even freely-floating in the packer shaft to allow for maximum flow. There are pros and cons to each ball valve location depending on job site condition and application and finishing techniques.  

Lastly, there are plastic alternatives commonly referred to as ‘bang-in’ or ‘hammer-in’. These packers do not have the threaded metal shaft, but as they are driven into the drill hole, the same compression seal theory takes hold as the tapered edges become lodged into the drill hole sides. Another form of plastic ports is a plastic, surface-mounted version that is commonly used in epoxy injection and/or in the event that drilling into the substrate would be considered harmful or ill-advised.  

For more detail on your specific project needs and packer or port recommendation, please contact a knowledgeable Alchemy-Spetec representative at 404-618-0438. Alchemy-Spetec offers all of the packers and ports listed above, as well as all of the chemical grouts and pumping systems required to make your next chemical grouting job a success!

Want more information on Alchemy-Spetec mechanical packers?

Download an Info-Packed Mechanical Packers Brochure!

Topics: Equipment & Accessories, All Posts

The PolyBadger: Tough and Compact Slab Lifting System

Posted by Andy Powell on Feb 12, 2018 10:00:00 AM

The PolyBadger: Tough and Compact Slab Lifting System

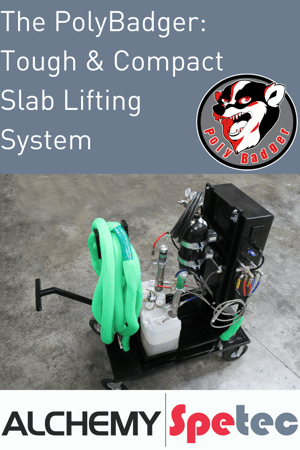
The PolyBadger_ Tough & Compact Slab Lifting System- blogThe Alchemy-Spetec PolyBadger lifting system is tough and compact. This system is an affordable entry-level slab lifting option for new contractors, as well as an extremely portable addition to the experienced contractor’s arsenal. The PolyBadger is a lot less expensive than your standard 20 foot trailer rig. The set up is simple and requires minimal equipment. The entire system can easily fit in the back of a pickup truck!

The genius of the PolyBadger is the auto calibrator. It keeps the flow of A-side and B-side slab lifting material on ratio, eliminating the possibility of crossover clogging in the gun or the whip hose. The two low-pressure transfer pumps and auto calibrator are literally the only moving parts in the whole system. That means less downtime, less maintenance, and more productivity on the job. This system is easier to use and a more affordable than many options on the market.

Want more photos and a detailed breakdown vs. other systems?

Download an Info-Packed PolyBadger System Brochure!

Topics: Equipment & Accessories, Lift Slabs

MixMaster Pro Series Part 4

Posted by Andy Powell on Jan 19, 2018 3:30:24 PM

MixMaster Pro Series Part 4

Alchemy-Spetec….We've Got Your Back!

Announcing the MixMaster Pro Stand Up Attachment

On our website, catalogs, and marketing materials we use a catch phrase “We've got your back”.  We try to live that every day and that focus has helped us become known for consistent product performance backed by superior support.

For the 2018 World of Concrete show, we want our slab lifting contractors and prospects to know that we not only have their backs, but that we also want to help their backs.  This year we are introducing our patent pending MixMaster Pro Stand Up Attachment.  No longer do you need to be on your hands and knees in order to level concrete with AP Lift polyurethanes.

MixMaster Pro Series Part 4The MixMaster Pro is already the fastest slab lifting production gun on the market, with the lowest operating cost.  But we just had to take it to the next level by designing an ergonomically friendly, back pain reducing standup system to go with it.  Sorry Advil and Aleve, we are going to be cutting into some of your business with this development.

For the most part slab lifting is not a physically demanding business.  Many of our customers are amazed at how easy it is and how rapidly you can achieve results by letting the equipment and the AP Lift 430 or AP Lift 475 do all the heavy lifting.  There has, however, always been that issue of having to squat down and standup so many times on the job.  If it’s a big warehouse job, that can be particularly grueling.

The MixMaster Standup Attachment takes that out of the equation.  Certainly there will be times when you cannot substitute getting down on a knee and having a close look at a crack or a joint.  But there’s no reason to do that on every injection.  Made of lightweight forged aluminum, the standup system operates the MixMaster while the operator stands comfortably.  For a stabilization job, like in a warehouse; you can rapidly inject points without wasting time kneeling and standing back up.  And when the job is complete, there’s no longer that aching lower back issue.

Come see us at our World of Concrete booth (Silver Lot #O40551) and have a look at the MixMaster Pro Standup Attachment.  You’ll see that We've Got Your Back in more ways than one.  You also won’t have to worry about being on a knee if someone happens to play the national anthem while you’re working.  Now the MixMaster Pro is also the most patriotic slab lifting gun on the market. 

Want more information on the MixMaster Pro & Stand Up Attachment?

Download an Info-Packed MixMaster Pro Brochure!

Topics: Equipment & Accessories, All Posts, Lift Slabs

MixMaster Pro Series Part 3

Posted by Andy Powell on Jan 17, 2018 2:57:17 PM

part 3-banner.png

Easy to Clean and Easy on the Wallet

part 3- blog.png

Today’s blog is part 3 of a 4 part series on the MixMaster Pro Slab Lifting Gun.  The big news is coming on Friday when Part 4 arrives just in time for the 2018 World of Concrete.  But that’s Friday so you have to wait.

In Part 1 and Part 2 we covered the advantages of the Mixmaster as it pertains to job safety and production maximization.  In part 3 I want to address the “Painless Procedures” part of maintaining the MixMaster Pro. 

When I first started in this business, I worked with a lot of contractors that used traditional spray foam guns that had been adapted to slab lifting.  We had the MixMaster gun at the time but we still had to penetrate the market with it.  My first contractors were skeptical of our system; a gun designed just for slab lifting.  But I remember watching them struggle with cleaning guns, dealing with crossovers, and ordering long lists of parts.

Now 5 years later, the MixMaster Pro is even more refined and we have well over a hundred out in the market.  Slab lifting contractors rave about how it takes less than 10 minutes to clean at the end of the day.  Getting the hang of operating it is very easy and it’s nice that clean up procedures are just as smooth. 

How about the spare parts?  Those of you who own all of the other types of slab lifting guns out there may not want to hear this; it’s going to hurt.  I have seen the orders that you guys are placing for gun parts.  It’s thousands of dollars per year.  I have one contractor who says they averaged from $1000 - 2000 per month on gun parts, to maintain one rig with two guns.  That is nuts.  They have been converted to MixMasters for about 4 months now and they just finally called to order a few spare parts.  It wasn’t because they needed them either; they just wanted to have a few things on hand just in case.

In my capacity I deal with a majority of the slab lifting customers we have.  In 2017 I would guess we have sold less than $5000 total in spare parts…for all of the MixMaster guns that we have in the field.  It’s time to stop beating your head against the wall with the other slab lifting guns. 

The MixMaster Pro has what you need:

  • Lowest new gun price on the market at $1495.00
  • Port travels with the gun – no tripping over ports, no wasting a port on every hole
  • 10 Minutes to clean at the end of the day
  • Lowest operating cost – It’s not even close
  • Easily adaptable to Deep Lift accessories

On Friday we are going to roll out something really cool.  Make sure not to miss part 4 of the series.

Want more information on the MixMaster Pro?

Download an Info-Packed MixMaster Pro Brochure!

Topics: Equipment & Accessories, All Posts, Lift Slabs

MixMaster Pro Series Part 2

Posted by Andy Powell on Jan 8, 2018 10:45:52 AM
slab lifting gun mixmaster pro alchemy-spetec
 

MixMaster Pro – The Production Beast!

In part one of our MixMaster series leading up to the World of Concrete, we highlighted the fact that contractors don’t have to worry about tripping over pre-positioned injection ports when using this gun.  With the MixMaster Pro system, the port travels with the gun and isn’t left in the hole.  So there's less to trip over or have your hoses and cords get caught on.

slab lifting gun mixmaster pro alchemy-spetec

If you have a system where you are clamping the gun to the port, then frankly, I am sorry for you.  I have seen first-hand how tedious it is to keep that connection clean and how much fun it is (NOT) to scrape cured foam off the vise grips and mixing module face of the gun.  This is a time waster for sure.  With the MixMaster Pro, you are able to move quickly from point to point, which saves time and money.

When I train installers in the field and we switch them from their spray foam style guns to a gun designed just for slab lifting, you can see their eyes light up once they realize how much easier it’s going to be.  The elimination of a port required for every hole not only eliminates a tripping hazard, but also maximizes production and reduces the cost of consumables.

On a typical job with traditional impingement guns, you have to place an injection port in every hole.  It’s a 5/8” hole to start with as opposed to a 3/8” hole with the MixMaster gun system.  3/8” holes take less time to drill, include less expensive drill bits, and reduce the percentages of hitting rebar or wire when drilling through a slab because of the drill bits having a smaller diameter.

Once our 3/8” holes are drilled it’s as simple as inject, monitor, and move to the next point when it’s time.  The other systems require: drilling 5/8” holes, hammering in the port and tightening with a wrench to anchor it into the slab, connecting the gun to the port with an overpriced, modified vise grip, then injecting until it’s time to move.  I have been on many jobs where this system is implemented and it is a LOT slower.

Increasing production is a way for you to realize the most savings, but you also can’t discount the savings on the consumables like the ports themselves.  MixMaster ports are 3/8” diameter and they cost less than larger 5/8” diameter sleeved ports.  So even if you used the same number of ports, the MixMaster system would be more cost effective.  Now factor in that you can do a typical residential job with one or two ports compared to 10-20 for the other guys, and those numbers will add up over time.  I consulted with one of our customers on a residential stabilization job a few weeks ago and the guys drilled a grid pattern with at least 50 holes.  They used two ports with our MixMaster Pro system.  A week earlier they would have used 50 ports.  That saved them over $50 on materials for that job; not a huge number but it adds up over a week, or a year.  That’s the cherry on top of all the money you can save on labor with our system.

Stay tuned for part 3 of 4 coming in a few days, in which I will continue to illustrate the low operating cost of the MixMaster Pro slab lifting system. If you are currently struggling with the cost of cleaning, maintaining, and buying parts for your impingement guns, you will want to read this next one.

I look forward to seeing you all at the World of Concrete, booth O40551.  Click here for an automatic discount on World of Concrete registration!

Want more information on the MixMaster Pro?

Download an Info-Packed MixMaster Pro Brochure!

Topics: Equipment & Accessories, All Posts, Lift Slabs

MixMaster Pro Series Part 1

Posted by Andy Powell on Jan 3, 2018 1:47:12 PM
part 1.png
 
part 1 (1).png

At Alchemy-Spetec we manufacture first class polyurethane and acrylic resins for Sealing Leaks, Stabilizing Soil, and Lifting Slabs. We also provide the delivery systems and training for using our products in the field.  Although I enjoy talking about all of our products and working with them in the field, I find that lifting concrete slabs and structures is the most rewarding and interesting to me.

One of the greatest public safety benefits a slab lifting contractor can provide for their workers is the elimination of tripping hazards on the job. I give talks to different building management associations like BOMA and IFMA, pointing out eye opening statistics about the costs of neglecting tripping hazards. A lost time accident for one of your workers is one of the most expensive costs to bear.

Last week I was training some slab lifting technicians on using our MixMaster Pro slab lifting gun. They really liked it and pointed out a number of advantages over the air and mechanical purge guns they were used to. I have heard these points made many times, but when the tech said he liked it because they weren't tripping over ports, I was caught off guard.

When I asked him to explain, he said that their old system required them to set injection ports in every hole. When they would then move back and forth injecting various holes to bring the slabs up, they would invariably trip over the pre-positioned ports. He mentioned that they were getting orange colored ports at one time in order to help address the problem.

A week prior, I experienced this myself on a curtain wall grouting job under a containment area. We had the same problem, and there were a LOT of ports to watch out for. At the end of the day,  we had to put up safety tape around the area to keep other workers from entering and possibly tripping over an injection port. To have that same situation brought up the following week, on a slab lifting job, was eye opening.

Indeed the MixMaster Pro gun does eliminate those types of tripping hazards for the crew. A port in every injection hole is a place to trip or have a hose or extension cord hang up. With the MixMaster Pro system, the injection port moves with the gun, leaving the area free of ports while your crew works. In fact it's not uncommon to use only one or two ports over the course of an entire residential job. 

Give us a call at Alchemy-Spetec and let one of our sales experts or field techs explain the advantages of the MixMaster Pro. If you want to start a business fixing tripping hazards by lifting slabs, we can help you out. If you already lift slabs, there may be different kind of tripping hazard we can help you resolve.

Stay tuned for part 2 of 4 coming in a few days and I look forward to seeing you all at the World of Concrete, booth O40551.  Click here for an automatic discount on World of Concrete registration!

Want more information on the MixMaster Pro?

Download an Info-Packed MixMaster Pro Brochure!

Topics: Equipment & Accessories, All Posts, Lift Slabs

The Importance of Personal Protective Equipment

Posted by Charlie "The Grout Geek" Lerman on Nov 15, 2017 11:27:53 AM

ppe- banner-2.png

ppe- blog-3.pngPersonal protective equipment, commonly referred to as “PPE”, is essential for minimizing hazards on the job.  Neglect can result in very serious injuries and possible death.  These injuries or illnesses can result from electrical, chemical, mechanical and many other hazards.

Personal protective equipment such as gloves, safety glasses, shields, protective shoes, hard hats, ear plugs and respirators are just some of the protective gear that is worn every day.  It is so important to know what to wear and when to wear it.  It's also very important to know is how to properly put on the safety equipment.  By law, workers must use protective equipment in the work place when it is required.

This brings me to a story about a on a project I was on many years ago.  I was training a new contractor's crew on sealing manhole leaks with polyurethane chemical grout.  When training work crews, I always put a heavy emphasis on safety.  Since we were working with polyurethane, I also made clear how important it is wear safety glasses or shields to cover your face.

A little later, when I was showing them how to mix the chemical grout, I absent-mindedly left my safety glasses on top of my head instead of pulled down over my eyes.  As I was pouring the chemical grout out of the 5 gallon pail and into a bucket - a tiny drop hit me in my left eye.  I was blind in that eye for two days.  I even thought I might end up losing sight in that eye. 

Fortunately I was fine a few days later.  But it was a very close call.  One I don't ever want to repeat.  This was all due to me forgetting to pull my safety glasses down over my face.  That is how quick it can happen!  So needless to say, it is important to follow safety procedures no matter what.  Accidents happen, but we want to follow every possible measure to prevent any tragic consequences.  

Want more information on Alchemy-Spetec products?

Download the Info-Packed Geotech Product Catalog!

Download the Info-Packed Leak Seal Product Catalog!

Topics: Equipment & Accessories, All Posts