Looking for a Contractor?

Alchatek Blog

Filling Voids Under a Driveway with AP Lift 430

Posted by Kreg Thornley on Nov 3, 2022 10:00:00 AM

Banner - Filling Voids Under a Driveway

Body - Filling Voids Under a Driveway

The ideal polyurethane foam for filling voids under a driveway, AP Lift 430 works in a variety of wet, dry, or harsh conditions, can support up to 7,200 lbs per square foot, and will cure to 90% full strength in 15 minutes. This two-component, high-strength, high-density, hydro-insensitive structural polymer weighs 2.75 – 3.25 pounds per cubic foot. When injected, polyurethane will conform to the shape of the void more accurately than other materials such as cement grout. And, unlike cement, it won't sink over time.

Watch the video below for a real-time example of polyurethane void fill with AP Lift 430. The structural stability of this driveway is under threat due to a very wide void ranging from one to two feet deep. Since the supporting soil on one side of the slab has entirely eroded away, it was possible to capture this process very clearly on video.

Watch the process closely and then call 404-618-0438 to be connected to your technical support representative for any follow-up questions. Alchemy-Spetec offers the most experienced tech support team in the industry. Contact us today for assistance on your next job!

Want more info on geotech products and equipment?

Download the Info-Packed Geotech Product Catalog!

Topics: All Posts, Lift Slabs, Stabilize Soil

Winterizing Your PolyBadger

Posted by Erik Prinzing on Nov 1, 2022 10:00:00 AM

Banner - Winterizing Your PolyBadger

Body - Winterizing Your PolyBadgerAs the weather gets colder, contractors in some regions will need to prepare their PolyBadger Lifting Systems for storage during the off-season. We're providing step-by-step instructions for that procedure in this article.

Prepping a PolyBadger for Winter Storage

  1. Establish power to the cabinet and heat the hose (A heater, B heater, and hose) to the target temperature of 130° F.
  2. Introduce material to the cabinet.
  3. Turn the air supply on and recirculate to heat up the ISO and resin.
  4. Once the PolyBadger is up to temperature, turn off the air supply and remove the airlines from the stick pumps.
  5. Remove the supply and the recirculation line from the A-side stick pump.
  6. Drain all the remaining material from the pump and clean it with brake cleaner.
  7. Place the stick A side stubby stick pump into a 5-gallon pail of the AS Pump Flush.
  8. Reconnect the supply line and leave the recirculation line to drain in a purge pail.
  9. Repeat steps 5-8 on the B-side stick pump.
  10. Reconnect the air supply to the stick pumps, hold the return lines in a purge pail, and slowly open the air valve on the stick pumps.
  11. You will notice material slowly pushed out of the recirculation line into the purge pail. Continue to pump AP Flush 121 through the system until it comes out of the recirculation line clear, with no added color or debris.
  12. Shut the air valve supplying the stick pumps. This will stop the flow of material.
  13. Reconnect the recirculation lines to the appropriate stick pump and tighten.
  14. Turn the recirculation pump valves to supply the hose.
  15. You can remove the Handi Gun or leave it on for this stage, holding the hose in the purge pail. Turn on the supply valves on the end of the hose just before the Handi Gun. Slowly open the air valve on the stick pumps and pull the trigger on the gun.
  16. You will notice material slowly pushed out of the hose line into the purge pail. Continue to pump AP Flush 121 through the system until it comes out of the hose line clear, with no added color or debris.
  17. Shut the air valve supplying the stick pumps. This will stop the flow of material.
  18. Remove the stick pumps from the AS Pump Flush. (Make sure to mark your pails A and B for future use).
  19. Insert stick pumps into AP Pump Saver 195. (Make sure to mark your pails A and B for future use)
  20. Push the AP Pump Saver 195 through the hose line. You will notice the AS Pump Flush slowly pushed out of the hose line into the purge pail. Continue to pump AP Pump Saver 195 through the system until it comes out of the hose line clear (you will notice a thick, clean fluid).
  21. Turn off the supply valves on the hose just before the Handi Gun.
  22. Disconnect the air supply to the stick pumps.
  23. Move the hose supply valve into the recirculation position to depressurize the system.
  24. Shut off supply valves to the cabinet.
  25. Turn off heat zones.
  26. Turn off the main disconnect.
  27. Remove residual grease from interior cabinet pumps.
  28. Replace with new grease.

Want more information on the PolyBadger?

Download an Info-Packed PolyBadger System Brochure!

Topics: Equipment & Accessories, All Posts, Lift Slabs

Winterizing Your Slab Lifting Rig

Posted by Stephen C. Barton on Oct 27, 2022 10:00:00 AM

Banner - Winterizing Your Slab Lifting Rig

Body - Winterizing Your Slab Lifting RigAs the weather gets colder, contractors in some regions will need to prepare their slab lifting rigs for storage during the off-season. We're providing step-by-step instructions for that procedure in this article.

Please Note:

  • You will notice that more care is given to the A-side of the system, this is normal.
  • This procedure assumes you are using a PMC pump.

Prepping a Slab Lifting Rig for Winter Storage

  1. Remove and clean the A and B stick pumps. Clean the exterior of the pumps with brake cleaner to remove as much residual resin and polyol as possible.
  2. Place the A-Side transfer pump into a 5-gallon pail of the AS Pump Flush.
  3. Remove the recirculation hose from the A-Side drum and place it in a purge pail.
  4. Open A-Side inlet valve and recirculation valve on your PMC machine.
  5. Slowly open the air valve on the A-Side transfer pump to start introducing the AS Pump Flush through the A-Side of the machine.
  6. You will notice iso material being pushed out of the recirculation line into the purge pail. Continue to pump AS Pump Flush through the system until it comes out of the recirculation line clear, with no added coloring or debris.
  7. Shut the air supply feeding the transfer pump. This will stop all flow of material.
  8. Un-cap the A-Side of the PMC whip hose. Once un-capped, place the hose into the purge pail.
  9. Close the recirculation valve on the A-Side of the PMC machine.
  10. Slowly open the air valve on the A-Side transfer pump to start the flow of AS Pump Flush through the heated hose.
  11. You will notice iso material being pushed out of the whip hose into the purge pail. Continue to pump AS Pump Flush through the system until it comes out of the recirculation line clear, with no added coloring or debris.
  12. Now that this process is complete, the A-Side has been completely cleaned of any iso material.
  13. Remove the A-Side transfer pump from the pail of AS Pump Flush and place it into a 5-gallon pail of AP Lube 190.
  14. Slowly open the air valve on the A-Side transfer pump to start introducing the AP Lube 190 through the A-Side of the machine. Continue to pump the AP Lube 190 until you have pure and clean AP Lube 190 coming out of the end of the whip hose
  15. Place the B-Side stick pump into a separate 5-gallon pail of AP Lube 190.
  16. Slowly open the air valve on the B-Side transfer pump to start introducing the AP Lube 190 through the B-Side of the machine and heated hose. Continue to pump AP Lube 190 through the system until it comes out of the end of the whip hose, with no added coloring or debris.
  17. Once the entire system is full of clean AP Lube 190, slowly start to recirculate the AP Lube 190 through the entire system. When doing this, it is best to let the PMC machine cycle while recirculating the AP lube 190.
  18. Once all these steps are complete, close the air on each transfer pump and re-cap the heated PMC whip hoses.

Want more information on geotech products and equipment?

Download the Info-Packed Geotech Product Catalog!

Topics: Equipment & Accessories, All Posts, Lift Slabs

The Deep Lock Process Explained

Posted by Kreg Thornley on Oct 25, 2022 10:00:00 AM

Banner - The Deep Lock Process Explained

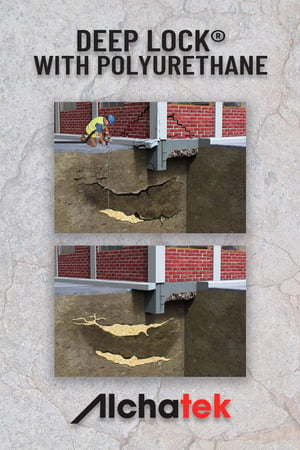
Unstable soil deep underneath private commercial property or public infrastructure can settle causing extensive and expensive damage. Poor compaction, water erosion, broken pipes, and organic material in this deep soil can make serious settling more likely.

How can you prevent settling and get long-term protection? Introducing the Deep Lock process. Alchemy-Spetec offers a unique combination of high-quality structural polymers along with the equipment and training needed to address deep soil issues. Now you can achieve soil stabilization and compaction on large projects faster without heavy excavation equipment, extended downtime, and risk of collateral property damage.

For a detailed explanation of the process, watch the animated video below...

Want more information on the Deep Lock process?

Download an Info-Packed Deep Lock Brochure!

Topics: All Posts, Stabilize Soil, Deep Lock

Case Study - Curtain Grouting a Complex Crack in a Basement Floor

Posted by Charlie "The Grout Geek" Lerman on Oct 20, 2022 10:00:00 AM

Banner - Body - Curtain Grouting a Complex Crack in a Basement Floor

Body - Curtain Grouting a Complex Crack in a Basement FloorIn Louisville, Kentucky the Presbyterian church owned two historic buildings with an alley between them. Last century, an addition was added removing the alley and connecting the two buildings. Unfortunately, the addition was not properly waterproofed during construction. This led to water below-grade infiltration and a plethora of very complex leaking cracks and joints in the basements of both buildings and the new connecting structure.

The building is still home to a Presbyterian church. For years, the administrators have been simply dealing with the water by channeling it, as best they could, to sump pumps. Many and various repair attempts have been made over the years, but none of them have been successful in the long term. Recently, the church administration reached out to BJB Restoration for help with this ongoing issue. Due to the complexity of the project, Alchemy-Spetec's Director of Technical Services - Leak Seal Division Charlie "The Grout Geek" Lerman was called in to consult on the job.

Powerful Polymers

The technicians chose Spetec PUR HighFoamer as the repair material for this job because its expansive nature when catalyzed with Spetec GEN ACC Accelerator makes it a very cost-effective curtain grouting polyurethane resin. This one-component, closed-cell, hydrophobic, water-reactive, solvent, and phthalate-free, low-viscosity resin is also ideal for filling any voids created by the water underneath the basement slabs.

Painless Procedures

This particular job was what we like to call exploratory grouting, focused on two trial areas of complex cracking. The crew started injecting in the area of the primary leak. As they injected, water and foam began to bubble up along an adjacent and previously unidentified trench-like defect as well as the cracking being addressed. The initial injection covered the main crack and a surrounding area of about 16 feet (thanks to the expansive nature of Spetec PUR HighFoamer). Outgassing (CO2 produced during polymerization) was visible in numerous defects outside of that radius, requiring additional injections to seal the entire area.

Rapid Results

This one-day exploratory grouting project provided the contractor with a very accurate understanding of the type of problem and soil conditions they were dealing in the basements. The contractor and church administrators subsequently agreed upon a long-term maintenance plan based on the church's budget that calls for periodic curtain grouting over the next few years to address the many remaining basement floor defects in both buildings.

Want more information on curtain grouting?

Download an Info-Packed Curtain Wall Grouting Brochure!

Topics: All Posts, Seal Leaks

Residential Leak Seal with Polyurethane Cartridges

Posted by Kreg Thornley on Oct 13, 2022 10:00:00 AM

Banner - Residential Leak Seal

Body - Residential Leak SealAs more property owners convert basements into living spaces, the demand for residential waterproofing increases. Some standard industry practices include using a sump pump to remove leaking water or applying hydraulic cement to the leaking side of the wall (negative side waterproofing). Neither of these is an ideal solution. Hydraulic cement is very rigid once it cures, and it cracks over time due to structural movement caused by freeze/thaw cycles and expansive surrounding soil. A home is often a family’s biggest investment, so most are looking for a cost-effective, durable, long-term repair.

Polyurethane leak seal grouts are injected into or through the wall to stop the leak at the source (positive side waterproofing). These products remain flexible after they cure, so structural shifts due to freeze/thaw cycles and expansive soils do not cause the cured grout to crack and fail. Polyurethane grouts are strong enough for use on large-scale, industrial structures. Alchemy-Spetec’s leak seal solutions are approved by the Army Corps of Engineers for use on U.S. infrastructure. These products contain no volatile organic compounds (harmful fumes) and are NSF/ANSI/CAN 61 approved for contact with drinking water.

Cartridges vs. Pumps

For small-scale residential applications, using cartridges is more cost-effective than using pails of material with a mechanical pump. The process is also less messy, saves a lot of man-hours, and allows for easy mobilization.

Products Available in Cartridges

Want more information on residential leak seal with cartridges?

Download an Info-Packed Residential Leak Seal Brochure!

Topics: All Posts, Seal Leaks

Case Study - Repairing a Footing in a Detention Pond

Posted by John Knieper on Oct 11, 2022 10:00:00 AM

Banner - Repairing a Footing in a Detention Pond

Body - Repairing a Footing in a Detention PondThis post is part of the Alchemy-Spetec Contractor Lens series, featuring views, news & case studies written by our customers. This article, written by John Knieper of SiteMix Pressure Grouting LLC, provides an overview of a repair job on a detention pond wall footer. If you're an Alchemy-Spetec customer and you'd like to discuss writing content for our blog, please send an email to marketing@alchemy-spetec.com today!

A general contractor working with a homeowners association reached out to SiteMix Pressure Grouting, LLC about a detention pond wall that was leaking along the footer in several places. A detention pond is designed to collect rainwater and then let it drain slowly in a controlled manner. But in this case, water was washing out quickly in an uncontrolled manner in multiple spots under the footing.

Powerful Polymers

To rapidly address the problem the technicians at SiteMix chose AP Fill 720 soil repair material. This single component, closed cell, hydrophobic, water-reactive, solvent and phthalate-free, low viscosity polyurethane foam has a high expansion rate and is ideal for filling voids. In this case, AP Fill 720 was the perfect choice for filling the soil voids underneath the footer created by water erosion.

Painless Procedures

First, the crew injected AP Fill 720 along 150 feet of the wall, installing approximately one gallon underneath the footing every two feet. Next, they installed another 75 gallons spot treating larger voids.

Rapid Results

The job was completed in only 2 days. The detention pond wall was ready for use immediately upon completion of the work. The general contractor and the homeowners association manager were very happy with the results.

Want more information on geotech products?

Download the Info-Packed Geotech Product Catalog!

Topics: All Posts, Seal Leaks, Stabilize Soil

Join Us in Supporting Hurricane Ian Relief Efforts

Posted by Stephen C. Barton on Oct 6, 2022 10:00:00 AM

Banner - Join Us in Supporting Hurricane Ian Relief Efforts

Body - Join Us in Supporting Hurricane Ian Relief EffortsAlchemy-Spetec is proud to donate a portion of all proceeds to the Volunteer Florida Foundation's Hurricane Ian relief efforts through the end of 2023. Join us in supporting our neighbors in Florida, who were affected by Hurricane Ian.

From the Volunteer Florida website:

The Florida Disaster Fund is the State of Florida’s official private fund established to assist Florida’s communities as they respond to and recover during times of emergency or disaster. In partnership with the public sector, private sector, and other non-governmental organizations, the Florida Disaster Fund supports response and recovery activities.

Donations to the Florida Disaster Fund are made to the Volunteer Florida Foundation, a 501(c)(3) charitable organization (EIN# 01-0973168), and are tax-deductible. Up to 3%, however, no more than $30,000 is typically taken from each donation to cover administrative costs, including but not limited to staff salary, indirect costs, and credit card and bank transaction fees. However, for Hurricane Ian, all administrative and credit card fees have been waived so that 100% of every donation can be used to help Floridians recover.

DONATE NOW

Topics: All Posts

Polyurethane Crack Injection Case Studies

Posted by David Park on Sep 29, 2022 10:00:00 AM

Banner - Crack Injection Case Studies

Body - Crack Injection Case StudiesThe Crack Injection Process

Crack injection is a precision-focused leak seal approach for smaller cracks or joints. Contractors repair these defects by drilling holes into the wall and inserting injection ports at an angle to intersect the crack inside the wall. Next, they inject polyurethane grout directly into the center of the crack through the ports. The resin rapidly reacts with water to form a flexible watertight seal. 

This process also protects the rebar inside the wall. Water intrusion through the cracks can lead to rebar corrosion and concrete spalling. Rusting rebar can expand six to ten times the original volume of the steel. This creates internal pressure on the concrete. While concrete is very strong in compression, it has a low tensile strength, and the expanding rebar will cause it to crack. When polyurethane resin is injected under pressure, it can encapsulate rebar and slow down the corrosion process.

Crack Injection Case Studies

Want more information on polyurethane crack injection?

Download an Info-Packed Leak Seal Methodology Brochure!

Topics: All Posts, Seal Leaks

Polyurethane Curtain Grouting Case Studies

Posted by David Park on Sep 27, 2022 10:00:00 AM

Banner - Curtain Grouting Case Studies

Body - Curtain Grouting Case StudiesThe Curtain Grouting Process

There are negative-side leak seal solutions, in which contractors apply surface treatments to the face of a wall to stop leaks. However, this is merely a band-aid approach. The water pressure coming through the cracks from behind the wall can still blow this band-aid repair right off. Contractors using positive-side solutions like curtain grouting can stop multiple leaks in a structure at one time.

In this process, holes are drilled through a structure in a diamond pattern. Next, expansive leak seal grout is injected through the structure, sealing leaks and filling soil voids on the other side. The grout quickly reacts with the water and cures to form a curtain wall made of a resin/soil mixture that seals the leak permanently. This is a positive-side waterproofing solution applied from the negative side.

Curtain Grouting Case Studies

Want more information on polyurethane curtain grouting?

Download an Info-Packed Curtain Wall Grouting Brochure!

Topics: All Posts, Seal Leaks