Looking for a Contractor?

Alchatek Blog

Andy Powell

Recent Posts

Slab Lifting in Cold Weather

Posted by Andy Powell on Dec 17, 2018 1:15:11 PM

Don’t let common preconceptions deter you from slab lifting in cold weather. There are many jobs to be done and many ways to keep your material conditioned.

Don’t let common preconceptions deter you from slab lifting in cold weather. There are many jobs to be done and many ways to keep your material conditioned. Contrary to popular opinion, as a contractor, you don’t have to put up your equipment and rigs due to cold weather. There are many jobs to be done and many ways to keep your material conditioned. Use this season to your advantage and gain valuable business.

Cold Weather Markets

Seasonal attractions such as theme parks are a great place to start looking for winter work. Many of these parks (the ones that aren’t in Orlando) shut down for the winter and this is the time they do maintenance and repairs. Think of all the concrete lifting and leveling that can be done.

Factories can be less active in the winter months with production slowing down in many industries. This is a good time for them to do maintenance and floor repairs as well.

Warehouses typically operate year round, so there is always work available. Warehouse floors are used and abused on a daily basis and will sooner or later need some form of repairs done to keep business running at a steady pace. In addition, many warehouses have dangerous voids beneath their floors that require repair.  

Exterior concrete slabs are still worth considering, even in the cold weather. These slabs experience the most wear and tear from the environment itself (think erosion) and daily traffic. You’ll need to lift concrete slabs before the ground freezes and only after your materials have been thoroughly conditioned.

Conditioning Materials

Your slab lifting equipment probably has built in heaters and a heated hose. Each brand and model of pump has different sized pre-heaters and different ∆T (∆ = Delta and T = Temperature). This sounds complicated, but is actually quite simple.  ∆T is simply the change in temperature.  Let’s say your material has been sitting in a cold trailer all night and the temperature has dropped to 40 degrees F. If the required temperature of your B side material is 120 degrees F, then your pump better be rated with a ∆T of at least 80 degrees. However, if your material is preconditioned to 70 degrees F, then your machine only has to be rated for a ∆T of 50 degrees. As I said, every machine is rated differently based on the size of the heaters. What is important to know is that there are limitations to how much heating your machine can do.

Keeping your materials conditioned in the winter months is a lot easier than it sounds. The main point is to keep your AP Lift products above 60 degrees at all times. Keeping the polyurethane at or above that temperature can be accomplished in a number of ways.

If you have an insulated rig, it should stay around 40 degrees warmer than outside temperatures. Most foam rigs have built in electric heaters that require an extension cord to a power outlet at the job site or at your facility for overnight storage. Alternately, you could buy an electric radiator heater. Other available heating devices include drum band heaters and heated drum mats (be careful not to scorch the polymers by turning band heaters up too high). For a more DIY approach, you could build a hot box around the material storage area in your rig.

Heat Sink

Another consideration when lifting cold slabs is the heat sink factor. AP Lift products come out of the gun hot and get even hotter as they react. However, cold concrete acts as a heat sink and sucks the energy out of the foam as it starts to react. This can slow down the reaction speed of the foam. If you are pumping into a void, it will have little effect because most of the foam is not in contact with the concrete. If you are trying to lift a slab with little void, it will have more of an effect because more of the foam is in contact with the cold concrete and cold soil. More volume = more energy.

Conclusion

Don’t let common preconceptions deter you from slab lifting in cold weather. As noted above, there is no need to shut down completely for the upcoming winter months if you don’t want to. Opportunities still exist and one of them may just be the job you’ve been looking for all year. There are many ways to keep your equipment and materials conditioned to efficiently work in lower temperatures. Have more questions about slab lifting in cold weather? Call us at 404-618-0438.

Want more in-depth info on slab lifting?

Download an Info-Packed Slab Lift Brochure!

Topics: All Posts, Lift Slabs

Lifting Slabs with AP Lift Foam: Polyjacking is the Most Efficient Concrete Leveling Method

Posted by Andy Powell on Dec 10, 2018 5:55:00 PM

Slab settlement can be restored at a fraction of the cost and time using our AP Lift series of resin. Leverage Polyjacking for efficient concrete leveling.

This video documents the raising of a driveway slab at an ATM drive-through in a busy bank. Customers’ cars were getting damaged when they suddenly dropped down onto the sunken section of the driveway. Needless to say, the property owner was highly motivated to resolve this liability in a timely yet reliable manner.


Sunken concrete slabs can be lifted back into place with two component polymer foam designed to work in wet or dry conditions. The expansion force of the foam coupled with the pressure of a specialized pump generate enough controlled force to lift virtually any structure back into position with 1/8" precision. Slab settlement can be restored at a fraction of the cost and time required for replacement using our AP Lift series of resins.

Want in-depth info on slab lifting procedures and products?

Download an Info-Packed Slab Lift Brochure!

Topics: All Posts, Lift Slabs

Common Slab Lifting Pitfalls and How to Avoid Them!

Posted by Andy Powell on Dec 5, 2018 4:40:56 PM

Probably more than 99% of slab lifting jobs go just fine, but these tips should help you avoid common slab lifting pitfalls and maximize your results.

Probably more than 99% of slab lifting jobs go just fine, but these tips should help you avoid common slab lifting pitfalls and maximize your results.

This last year has been crazy busy; we have been on so many slab lifting projects with our contractors. From residential to commercial/industrial, slab lifting with polyurethane is proving to be a huge success. However, there are some patterns that have emerged in terms of the challenges that contractors face. Probably more than 99% of slab lifting jobs go just fine, but these tips should help you maximize your results.

Something’s Gotta Give - Bound Slabs

The AP Lift series of polyurethanes are very powerful; capable of lifting slabs several feet thick. So if you suspect you have a slab that might bind or hang up, you need to take precautions. Otherwise you risk breaking it. In this business you’re going to deal with control joints, expansion joints, and cracks (both hairline and major). You have to do your best to clean them out. A proactive saw-cut on a joint might make your life easier. Routing out a joint or a crack with a diamond sawzall blade, a thin trowel, or some compressed air is going to pay dividends. Lubricate joints, cracks, and edges with AP Flush 125 for rapid results.

Heavy Structures with a Small Footprint

These types of lifts are the toughest. A typically sized two foot thick slab with equipment on it will often come up easier than a set of front steps, a chimney, or a footing. Polyurethane foam likes to have a little bit of room to spread out and lift; when there is concentrated weight on a small base, the poly will try and squeeze out the sides. If the soils are soft or water saturated, it is even more challenging.

Try making the foam work for you. Use short, controlled shots of material that don’t travel very far. Inject a few perimeter shots to create a damming effect that will retain additional foam injected inside of the perimeter. Finally, don’t be afraid to use some mechanical assistance. There have been some unique lifts of this type done with the help of various jacks, levers, and beam systems.

The Wrong Part of the Slab is Lifting

I was on an interesting sidewalk slab lift project awhile back. We had finished several jobs over two days and were feeling pretty good about things; so I wasn’t paying close attention. My contractor, however, was paying very close attention to the joint where he was trying to get lift. So much focus that he did not notice the slab was actually lifting behind him and not where he wanted or anticipated it to.

So how do you avoid this? First of all keep your head on a swivel. ALWAYS be paying attention to what is going on around you – looking for movement, escaping foam, cracks developing.

Secondly, be patient. Use short controlled shots of foam, let that material set up and gain some strength. Then drill through it and inject more material below. This keeps it concentrated in one area instead of allowing it to push under areas you don’t want to lift.

Third – monitor the slab at various points with dial indicators, zip levels, string lines, or laser transits so you know what is going on at multiple points. And last of all, perhaps that joint that won’t move is bound and needs to be saw cut.

Cracking the Slab

If you have worded your contract correctly, you should have some language covering you in case cracks appear while the slab is being lifted. Concrete slabs crack as they settle so it is logical to assume that they may crack when being raised. To keep cracking to a minimum, here are some tips:

  • Short controlled shots of material – no need to be in a hurry – constantly monitor the slab for movement.
  • Use common sense – a long slab will need support as it is being lifted. I usually start at the lowest point and start my injections there. I will spread out and hit other points and bring the slab up gradually. As it is lifting it will create voids that need to be filled with supporting foam.
  • Know when to stop – sometimes it is that last shot of material that cracks the slab. You are trying to get that last 1/10th of an inch lift to make it perfect and the slab doesn’t want to move; then a crack appears. If a slab stops moving it is probably binding, and this can sometimes occur right when it is a hair from being back in place.
  • Last of all, don’t panic if you crack the slab. If you act or look like you just did something terribly wrong, the property owner will pick up on that and then you may have an issue. The slab you just lifted is now supported and stabilized from below; the crack is not a sign of something wrong. Usually the cracks that occur are of the hairline variety and will often close right back up as you complete the lift. So be cool!

Property Damage

Damaging someone’s property is a sure fire way to turn a profitable day into a loss. The main type of property damage I have seen is from getting polyurethane on things that you’re not supposed to. Keep these tips in mind:

  • Don’t pull off an injection point too soon. Let the material get its initial set before removing the port or the gun. This is the most common way to get foam on yourself and others.
  • Don’t get too far ahead drilling holes. So many contractor crews I work with have one guy who wants drill all the holes before the other guy even starts injecting. Unless this is a giant warehouse job; don’t be in such a hurry. Too many times I have seen foam shoot out of an uncovered drill hole and get all over something. If you insist on it, then place dowels or plugged ports into those holes to prevent a blowout.
  • Cover stuff with plastic – take the time to do this. And even better, create a simple shield to go around the injection gun. A 30 gallon plastic garbage can with a doghouse opening cut into it makes a very effective containment shield.
  • Do your gun and hose maintenance in the rig, not on someone’s driveway or pool deck. B side drips typically clean up with water; A side drips however, clean up with time or money.

Over-Lifting

So you have gone and over-lifted a slab. Welcome to the slab lifting hall of shame – ha ha. This is one of the questions that I get asked a lot: “What happens if I over-lift a slab?”

In all my years of consulting, I’ve heard of this happening only a handful of times - and I’ve only witnessed it once. Lifting with polyurethane is very precise. Slab lifting doesn’t typically get out of control. With short controlled shots of material (do you sense a theme here?) you can anticipate how much a slab will continue moving after you stop injecting.

Monitor the slab in multiple places and keep your head on a swivel, as I recommended earlier. If you’re lifting near a doorway, constantly check the swing of the door to make sure it isn’t starting to stick. Take your time, think through what you’re doing, and you are unlikely to ever over-lift a slab.

Want in-depth info on slab lifting procedures and products?

Download an Info-Packed Slab Lift Brochure!

Topics: All Posts, Lift Slabs

Estimating Material for Slab Lifting Jobs

Posted by Andy Powell on Dec 3, 2018 2:14:23 PM

Through a combination of calculations, product information, and site considerations, you can estimate your slab lifting materials without too much trouble.

Through a combination of calculations, product information, and site considerations, you can estimate your slab lifting materials without too much trouble.

Material Calculation

Through a combination of easy calculations, product information, and some site considerations, you should be able to estimate your slab lifting materials without too much trouble.

First of all you need to think about the basic volume calculation:

  • How many square feet of slab are you jacking?
  • How far do you need to lift it?
  • Is the whole slab being lifted or just one end of it?  

Search Alchemy-Spetec in your Apple App Store or Google Play Store to install the Poly Estimating App for a quick and easy way to make these calculations. 

Specific Considerations

Beyond the geometry required to estimate lifting the slab, you must now take into account some job specific considerations. This is where it becomes critical to qualify the volume of material included in your proposal. And just as important, this is where you need to make sure you have included enough so you get the job done right and don’t have to go back to the customer asking for more money. Sometimes that’s unavoidable if you encounter surprises; but by keeping a few considerations in mind this can often be avoided.

Soil Compaction

It was Isaac Newton’s third law of motion that determined that for every action there is an equal and opposite reaction (or was that Wayne Newton?). If you are trying to lift a slab, a porch, or a pool deck on ground with poor compaction or water issues, the foam will compact the soil until it is dense enough to support lifting the slab or deck. And the heavier the object, the more densely the ground will have to be compacted. Make sure to measure the soil conditions (using a penetrometer or probe) and adjust your material estimate accordingly.

Size/Shape of the Object Being Lifted

Extremely heavy objects can be lifted with polyurethane foam using a small amount of pressure and material. Often times the most difficult lifts are the smaller objects. Something with a small footprint, like some front steps or a stoop can be very dense and frustrating to lift.

Injected material is going to seek the path of least resistance until it is contained enough to generate the lift. For a front stoop it is usually going to be out the sides; meaning lost material and more cleanup. Proper injection techniques can contain the escaping material, but it is advisable not to underestimate your material on an innocent looking small job.

Voids

Sometimes the ground can be well compacted but due to erosion factors (usually misdirected water runoff) slabs and other foundation type settlement can occur. Although the object has only settled a few inches, sometimes a much deeper void can be hidden from view. In these cases, it is advised to use a probe through a hole drilled in the slab in order to get an idea of the depth of the void.

Personally, I have seen voids that went down 20 feet, so do not ever assume anything. Most voids are pretty easy to determine and you will get the optimum expansion out of your material when filling them. But once again, calculate the extra volume to fill and spell it out in your proposal.

Include Contingency Material

Typically for a lifting job without other considerations besides the lifting volume, we recommend adding an additional 10-15% onto your material estimate to cover yourself. Just make sure you do a thorough evaluation of the conditions and possibilities so you don’t underestimate the job and have to go back to the property owner with your hand out.

Want in-depth info on slab lifting procedures and products?

Download an Info-Packed Slab Lift Brochure!

Topics: All Posts, Lift Slabs

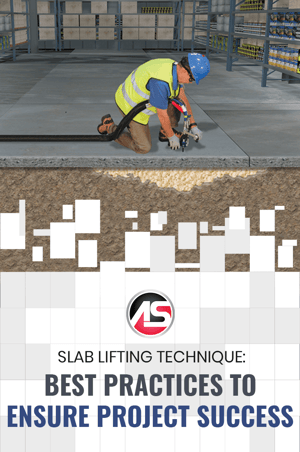
Slab Lifting Technique: Best Practices to Ensure Project Success

Posted by Andy Powell on Nov 30, 2018 10:00:00 AM

When embarking on a polyurethane foam slab lifting job, it’s important to have a thorough understanding of industry best practices of slab lifting technique

When embarking on a polyurethane foam slab lifting job, it’s important to have a thorough understanding of industry best practices of slab lifting techniqueWhen embarking on a polyurethane foam slab lifting job, it’s important to have a thorough understanding of industry best practices. There are a great number of details to be aware of, but they’ll eventually become second nature as you get comfortable with the process.

For simplicity’s sake, we’ll divide the best practices of slab lifting into three sections:

  • Preparation
  • Lifting the Slab
  • Wrap Up

Preparation

Let’s start with the very basics. Make sure you have enough polyurethane to complete the job. Check your containers if you’ve used them for previous work. You also want to check the fuel levels in your generators and compressors before you begin. There’s no sense in having to stop in the middle of everything and run to the gas station.

When you arrive on the site, double-check location of buried utilities and other underground infrastructure. For public utilities you can rely on a utility location service. For other underground items such as pool pumps, sprinkler systems and drainage pipes from gutters, you’ll have to rely on the property owner. In both cases, make sure you have a thorough understanding of the subterranean layout before you begin.

Another essential preparatory step to evaluating a job site is to document the existing conditions of the site. Take photos of the sunken slab with a ruler or a tape measure to show the extent of the settling. You can use these photos in “before and after” sequences for marketing purposes. Also note or photograph any property damage for which you could be mistakenly held responsible, such as marks on walls, cracks in the slab, and jammed doors or windows.

Polyurethane foam, once cured, is VERY difficult to remove. That a testament to its strength and binding qualities, but can be quite a pain if you accidentally splatter some on your customer’s property. Fortunately there’s a simple solution: plastic sheeting. Make sure to cover any critical property that can’t be moved out of the way. For example, if you’re lifting a warehouse floor next to heavy machinery that’s secured to the floor, etc. You’ll also want to set up your work space (where you place your pump, material containers and tools) on plastic.

Lifting the Slab

The first step in the slab lifting process is to make sure that the slab is liftable. In other words, check the joints around the edges, where the slab connects to walls or other slabs. Make sure they’re clear and the slab isn’t fused to those other objects. In many cases, you may need to either saw cut some joints or clean them out with a sawzall or a trowel. Set up monitoring instruments such as dial indicator, zip level or laser transit (or string line.)

Next, you’ll want to set up a measuring device that accurately indicates when and by how much the slab lifts. Three of the best options are a dial indicator, a zip level or a laser transit. If you don’t have any of those, a string line will suffice.

Now it’s time to lay out the drill holes. Start at the lowest point on the sunken slab. In general you’ll want to measure up about one third from the lowest point, one third in from the sides and put your first drill holes in those locations, then work your way up. But each slab is different, so the main point is to consider very carefully where stress points may occur under the slab as you inject the expansive foam. A gradual, measured approach is always best. You can always pump more foam, but you can’t undo a cracked slab resulting from too much foam injected in the wrong place.

Before you begin work on each section of the slab, spray AP Flush 125 along joints and around the outside of drill holes to impede foam bonding to the concrete surface in case it ends up overflowing into those places. This is a critical step, since – as mentioned earlier - it’s very difficult to remove foam once it has cured. While injecting, use longer shots to move the material out wide and fill voids, and use shorter controlled shots to get foam to cure right beneath drill hole area and lift.

While injecting polyurethane foam, it’s important to maintain a 360 degree field of awareness. You’ll need to strike a balance between paying attention to the injection gun you’re holding in your hands while at the same time keeping an eye out for slab cracks, unwanted foam overflows, etc.

Do not try to lift the entire slab from one drill point. Smaller injection amounts, spread across many drill points will greatly reduce your chance of accidentally cracking the concrete. If you see material leaking out from underneath the slab, stop and let it cure. Then drill through the cured foam if necessary to continue lifting. If you see material shooting out between joints, stop immediately and clean the joints out so the foam doesn’t cure and lock your slab in place.

Another detail to be aware of is pump pressure. Check regularly to make sure you’re getting equal pressure on both the A and B sides. It’s important to keep the pressure between 1200 and 1500 psi.

If you’re working near any windows or doors, check them occasionally to make sure they’re still opening and closing freely.

Wrap Up

After leveling and/or stabilizing the slab, trim all excess foam that has eased out from underneath the slab. Sweep up any cured foam bits, concrete dust, etc. Patch all drill holes with a fast set mortar or self leveling crack filler. If you were unfortunate enough to end up with cured foam on the concrete surface, you can attempt to remove it with a wire brush or a pressure washer.

Again, the best approach is to be careful enough during the job that you don’t end up with this problem. Lastly, you’ll want to get documentation of the site after you’ve finished. Be sure to take “after” photos from the exact same angle you shot the “before” photos for maximum impact when they’re viewed side by side.

Want in-depth info on slab lifting procedures and products?

Download an Info-Packed Slab Lift Brochure!

Topics: All Posts, Lift Slabs

How to Evaluate a Job Site for Slab Jacking

Posted by Andy Powell on Nov 26, 2018 3:41:23 PM

Any successful slab lifting job begins with a thorough site evaluation. Learn how to properly evaluate a job site for slab-jacking.

Any successful slab lifting job begins with a thorough site evaluation. Learn how to properly evaluate a job site for slab-jacking.Any successful slab lifting job begins with a thorough site evaluation. Some new jobs are similar to previous jobs, some just look similar, and many are a completely new experience altogether. A site evaluation is not limited to but should include: Identifying the Cause of Settlement, Gathering Information, Identifying Potential Hazards, and Visualizing the Mobilization.

Identifying the Cause of Settlement

Determining the cause of settlement is usually the first step in beginning your evaluation. The cause can be any number of things such as erosion, groundwater, sinkholes, poor compaction, and buried debris that breaks down over time. Correctly identifying the cause will help you determine if slab jacking alone will solve the problem or whether a combination of lifting, stabilizing, and / or void filling will provide the permanent solution.

Gathering Information

The next phase should include gathering information from multiple sources. This includes dimensional information such as length and width of the slab; but also the amount it has dropped, to help determine the volume of structural foam needed to lift the slab back into place.

Make sure to bring your camera, notepad, and tape measure. Gather information from the property owner; find out about any known irrigation, electrical, water, or drain lines. Specifically, find out from the owner about any areas or features that need protecting around the injection site, the location of your rig, and all points in between where your crew may be working.

Identifying Potential Hazards

If the job is outside of a building, find out where the utilities are and have them professionally located. It’s a lot harder to get paid when you have just drilled through the owner’s power line or filled his landscape drains and fountains with foam.

Additional information that may be available could include a soils engineering report, a structural engineering report, and reports from the builder of the structure. Don’t forget a hammer drill, bits, and a penetrometer to determine soil compaction. Think about other issues that might create problems like slabs binding (concrete saw?), bent rebar from a settled slab, etc. Make sure you have considered all of the tools you are going to need for the job and the clean up.

Visualizing the Mobilization

After the data gathering is complete, it’s time to visualize the job site as a whole and consider any challenges to mobilizing and physically reaching the areas that need lifting. Think about potential issues: How big is your rig? Is a trailer rig or a box truck rig going to face challenges getting into and out of the area? And once your rig is in place, do you have enough heated hose and pump power to get the required volume of material where it needs to go to do the lift?

Some of the above seem obvious but sometimes it’s the obvious that gets overlooked. And mistakes like that drastically cut into your profitability and reputation. There’s a reason pilots go through the same checklist prior to every flight. Sometimes you only get one chance to do the job.

Want in-depth info on slab lifting procedures and products?

Download an Info-Packed Slab Lift Brochure!

Topics: All Posts, Lift Slabs

Essential Accessories Needed to Start Your Own Slab Lifting Business

Posted by Andy Powell on Nov 21, 2018 11:14:00 AM

There are still some accessories and miscellaneous items that will be helpful for your success in starting your own slab lifting business. Learn more...

There are still some accessories and miscellaneous items that will be helpful for your success in starting your own slab lifting business. Learn more...Structural polyurethane foam for concrete leveling is revolutionizing the slab-lifting business.  These powerful polymers are some of the most resilient lifting solutions ever created, requiring less manpower, lower costs, and bigger profit margins.

In our previous blog post, we discussed the essential tools that make up a polymer slab lifting rig.  However, there are still some accessories and miscellaneous items that will be helpful for your success.  We’ve included a categorized list below to help you out...

Site Evaluation/ Job Documentation

While evaluating a site and creating a quote, we recommend using:

  • A Note Pad and Pencil
  • A Calculator
  • A Camera with Still and Video Capabilities
  • A Tape Measure
  • A Soil Probe or a Fiber Glass Driveway Marker (for checking soil density)
  • A Laser Level or Transit or Zip Level (to detect slab movement and know when to stop lifting)
  • A Dial Indicator (to determine movement of a slab adjacent to another slab)

A word of advice: taking before and after photos using a tape measure is a great way to showcase the work on your website.

On-Site Job Tools

For completing slab lifting jobs we recommend the following tools on-site:

  • A Hammer Drill
  • 3/8” Hammer Drill Bits
  • Clean Buckets
  • Extension Cords
  • Trowels with a Thin Flexible Diamond Shaped Blade
  • A Sawzall with Diamond Blade and Regular Blade
  • A Concrete Saw
  • A Garden Hose (to connect to nearby water source)
  • Channel Locks, A Pry Bar
  • Airless Sprayer such as a Titan 440 for pumping gun flush through the MixMaster Pro Gun
  • Miscellaneous Hand Tools and Wrenches
  • 3/8” Nylon Ports for the MixMaster
  • A Regular Drill for the Paddle Mixer
  • A Paddle Mixer for Mixing Flush Concrete
  • Teflon Tape
  • Shovels

Safety Tools

  • Disposable Gloves (keep a few boxes on site)
  • Safety Glasses (for all crew)
  • Respirators (for environments with little to no ventilation)

Clean-Up

  • Hole Patching Material
  • Garbage Cans and Bags
  • Plastic Sheeting
  • A Broom and Dustpan
  • Rags
  • Brake Cleaner
  • MixMaster Cleaning Kit
  • Can of Acetone (for cleaning injectors)
  • White Lithium Grease (included with rig)

Every job will be different, and this is by no means an exhaustive list, as you go along you will learn what tools your specific company needs. These lists should cover all the basics for now.

Want in-depth info on slab lifting procedures and products?

Download an Info-Packed Slab Lift Brochure!

Topics: Equipment & Accessories, All Posts, Lift Slabs

Essential Gear for Starting Your Next Generation Slab Lifting Business

Posted by Andy Powell on Nov 19, 2018 2:49:45 PM

Polyurethane Slab Lifting is a Popular Add-On Service for Contractors Across the U.S. Get Info on Gear You'll Need to Start Your Slab Lifting Business. Read more...

Slab lifting with polymers is rapidly replacing old technologies because it’s fast, strong, doesn’t shrink, and has a low impact on the environment. So it’s no surprise that we get a lot of inquiries from contractors interested in adding this service, in addition to individuals wanting to create a startup slab lifting business. So what exactly are we talking about in terms of the essential gear?

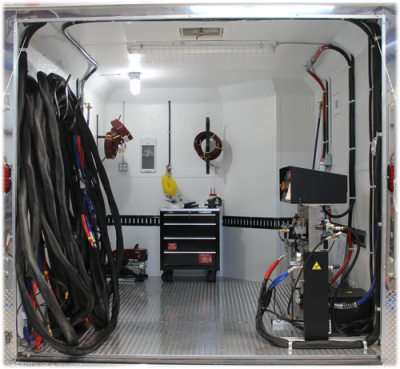
A slab lifting rig is a rolling business unto itself. It is a self contained, turnkey, mobile unit that has all of the equipment necessary to perform the work. There are a variety of configurations but all of these setups will contain the following: Trailer or Box Truck, Power Source, Compressed Air System, Fluid Transfer System, Proportioner Pump, Heated Hoses, and Impingement Gun. Let’s look at these in more detail.

AP-Trailer-Rig2

Trailers and Box Trucks

This is a matter of preference but since this business is mobile, you need to have one or the other (unless you start out with the ultra-mobile PolyBadger system for small jobs). I prefer trailers because they are easier to load material into if you don’t have a forklift. They are lower and can be equipped with a ramp door for the back of the unit. A trailer can be dropped at the jobsite freeing up the pickup truck for scouting other jobs or for grabbing supplies. Box trucks do have their place too and in some cases may be required for performing slab lifting for DOT work. In both cases we recommend a high ceiling height and at least 16’ of floor space to work with.

Power Source

Although some slab lifting rigs are designed to work off of shore power, most of them contain a generator to provide power. A rig that is properly built will have a breaker panel allowing the operator to switch on and off the different systems that require power. Depending on the type of proportioner installed in the rig (and the size of the heaters), the generator can be either a gasoline powered unit at approx 18kw, or a diesel powered generator ranging from 22kw to 40+kw power.

Compressed Air System

There are some proportioner pumps such as PMC’s PA-25, where the main pumping action is done through pneumatic power. These units have high CFM requirements and thus need a larger air compressor. Other proportioners like PMC’s PH Series operate off of hydraulic motors and don’t require air at all.

Some air is always needed though, for running the pumps that transfer the polyurethane from drums and totes over to the proportioner. A complete compressed air system will always include an air compressor and air drying system. An air drying system can be either desiccant style or refrigerated.

Fluid Transfer System

Polyurethane lifting foams are two component systems which means there is an “A” side and a “B” side. When these two components meet they react and form structural foam. Because the reaction is so fast, great care is taken to ensure the A and B components are kept separate until the actual point of spraying or injecting. A typical slab lifting rig is going to use either drum transfer pumps (sometimes referred to as stick pumps) or diaphragm pumps to pull material from the drum or tote sets and then transfer that material over to the proportioner. There will be a dedicated “A” side pump and a dedicated “B” side pump.

Proportioners

The proportioner is the heart of the slab lifting rig. Every proportioner should have the power to heat the A side and B side materials to the required temperatures while the materials are actually flowing. Additionally, a proportioner must then also have the pumping power to push the two preheated materials through up to 410’ of heated hoses, maintaining up to 2000 psi the entire way. Because the A material (ISO) is thinner than the B material (Polyol), separate temperatures must be maintained both within the proportioner and through the length of the heated hose. Solid state controls are used to monitor and adjust the temperatures.

Heated Hose

The heated hose system is actually a bundle of a few different hoses. There is an individual hose for the A (ISO) material and B (Poly). Each of those hoses has a heating element to keep the materials at their correct temperatures. PMC makes a superior heated hose that has braided heating element s that completely surround the hose for even heat. Heated hoses usually come in 50’ sections and between the second to last and the last section will be a temperature sensing unit (TSU) that relays temperature information back to the proportioner.

This TSU is sending the info through a thermocouple wire which runs the length of the hoses out to the TSU. The temperature information relayed to the proportioner lets it know whether to send more power or to back off the power as necessary.

For example, on a hot day there may be very little hose heat required while on a cold day a constant stream of power will be keeping the materials in the hoses up to temperature. Also within the heated hose bundle will be an air hose for compressed air to power air purge impingement guns. For fluid purge impingement guns designed for slab lifting, a fluid line will also be bundled together to transfer the flush required to blast clean the mix chamber of the gun.

Click the MixMaster gun link to see this type of gun used for slab lifting and resisting back pressure inherent in this line of work. Finally, all of the hoses are contained within a durable scuff jacket to keep the hoses from being damaged while dragged around the job site.

Impingement Gun

Whether spraying foam or injecting foam for slab lifting, these A and B materials must finally meet. This meeting occurs within an impingement gun. The materials are “impinged” or squeezed through tiny orifices which generates a high pressure stream of A and B (Iso and Polyol). When the preheated, high pressure streams of material meet, the reaction is almost immediate. At this point the mixed materials are ejected through the end of the gun, and beneath a slab.

The ensuing reaction, in addition to the pressure from the pump, generates the force required to lift. This could be either lifting a small sidewalk slab or lifting a railroad track or building foundation. Frankly it is incredible what the entire system working together can do. Because of the incredible back pressure generated from this operation, a gun like the MixMaster Pro is recommended because it is designed specifically for this application. It is not a spray foam gun modified for lifting.

Well this covers all of the main components that make up a slab lifting rig. There are other accessories like fresh air systems, air conditioning, heaters, etc that can be incorporated into a rig but how you customize it is up to you and your wallet. The next blog will include other tools of the trade that will assist you in your success.

Want in-depth info on slab lifting procedures and products?

Download an Info-Packed Slab Lift Brochure!

Topics: All Posts, Lift Slabs

Marketing Your Slab Lifting Business

Posted by Andy Powell on Nov 16, 2018 1:43:09 PM

Marketing your new slab lifting business takes time and the right approach. See tools and strategies to help you market your slab lifting business.

Marketing your new slab lifting business takes time and the right approach. See tools and strategies to help you market your slab lifting business.Marketing your new slab lifting business takes time and the right approach. If your slab lifting business is a small to medium-sized operation, tools and strategies that increase your market presence and help you attract leads are extremely important. Here are a few you may need to get started...

A Website That's Attractively Designed, User-Friendly and Optimized for Search

Regardless of your industry, a website is an imperative tool that validates your business and arguably serves as your first line of sales and marketing attack. Professional design, photography and content will help you stay competitive and either depict you as a confident, articulate leader in your field or just the opposite (if it's not professional). Even as a B2B website, up-to-date design and user-friendly navigation that creates clear information pathways is important. 

Did you know that a significant number of website visitors make up their mind within seconds whether or not they “like” the business based on the look of the site? And frustrated users who are forced into repeated clicks to arrive at their intended destination, or who must sift through poorly presented messaging are likely to leave and not return. Just as you invest in the tools of the slab lifting trade, investing in your website with regular content updates and a design refresh every 3 years or so is a sound best practice.

It is also imperative to make sure that your website is Search Engine Optimized. Designing a search friendly site for your industry niche and market location will make a world of difference in the amount of leads you capture via your online presence.

All of this means turning to a professional and reputable website firm to do the work – even if you’re starting out with a small brochure site for now.

Marketing Strategies

Partnering with Complimentary Companies

You may want to find companies that serve your market, but offer slightly different services. For example, foundation contractors, pool contractors and landscaping professionals in your area may be interested in trading leads.

Exhibiting at Home Shows

Home shows are a great place to meet potential customers and partner companies. Contractors tell us over and over again that home shows are a GREAT source for leads.

Presenting at Professional Associations

Giving presentations at local chapters of professional associations like the Building Owners and Managers Association (BOMA) and similar organizations is a great way to network, meet potential customers and lead sources, etc. Activities like these establish you as a local expert, and encourage people to come to you when they have slab settlement problems.

Want more contractor marketing strategies and additional resources?

Download an Info-Packed Contractor Marketing Brochure!

Topics: All Posts, Lift Slabs, Business Tips

Selling the Customer: Why Polyurethane Slab Lifting Is the Better Choice

Posted by Andy Powell on Nov 14, 2018 10:20:23 AM

Polyurethane slab lifting foams are one of the most resilient foundation repair solutions. Guide your customer in using a solid polyjacking repair solution. Read more...

Polyurethane slab lifting foams are one of the most resilient foundation repair solutions. Guide your customer in using a solid polyjacking repair solution. Read more...The first question any engineer will ask is “Does the solution fit the needs of the application?” When it comes to structural foams used for slab lifting repair projects, you can confidently answer “yes.”

But if you want to guide your customer to a concrete leveling repair solution, you should also be able to illustrate the pros, explain the cons, and enunciate the selling points.

Enduring Strength of Polyurethane Foam

Concrete, a mixture of cement, sand and aggregates, weighs on average 150 pounds per cubic foot, and high-density concrete can weigh in at 300 pounds or more. Any material used to serve as an elevating cushion of support between concrete and soil is literally caught between a rock and hard place – the concrete and the natural soil on which it rests.

By definition, structural foams need only be strong enough to heft sinking slabs back to level ground and durable enough to stop them from sinking again once cured. But polyurethane foams are actually one of the most resilient foundation repair solutions ever innovated.

Rated on density and compressive potency, the strength-to-weight ratio of lifting foams is staggering. Successful applications include airport runway and railway bed repair projects – in other words, structural polyurethane slab lifting foams like AP Lift 475 are heavy-duty enough to support the lift-off and landing of a 747 or the constant travel of a freight train.

Cost-Effective Option

Demo and rebuild or rethink and repair – these are, generally speaking, the two available resolution options when shifting soils give way under structural foundations and existing slab work. When possible, remediation repairs for settling concrete require far fewer resources than reconstruction.

Traditional mud jacking, which requires hydraulic pressure to inject mud into the void or weak soil beneath the slab, can’t hold a candle to the power or expanding, high-density polyurethane foam. Lifting foams are injected in bursts and rapidly expand 15-25 times or more the original volume, filling voids or strengthening soil in the affected space and creating comprehensive support. These stronger-than-bedrock polymers also subdue the kinds of stress points that mud jacking applications can create, eventually causing cracking and a second round of expensive repair work.

Another contrast with traditional mudjacking materials is the fact that polyurethane does not shrink or wash out over time, saving property owners the extra cost of re-treating the problem at a later date.

Rapid Delivery

Slab lifting foams don’t just save money, they save time. Because of their expansion properties, they can be applied quickly to lift slabs, and curing doesn’t require the same amount of time as other solution applications, such as mudjacking with cement slurry. That means a seasoned slab lifting technician can deliver project completion – with drive-on capability – in a much more efficient manner. Depending on contingencies and project timelines, that savings alone can be worth its weight in gold to potential customers.

Want in-depth info on slab lifting procedures and products?

Download an Info-Packed Slab Lift Brochure!

Topics: All Posts, Lift Slabs